
# Installation

Learn how to install the WPRelay plugin in your store to increase your sale and revenue using affiliate marketing through this simple guide.

This article assumes that you have already purchased the WPRelay plugin from our site and downloaded the WPRelay plugin zip. file.

{% hint style="info" %}
Haven't yet purchased the WPRelay PRO?

[Buy WPRelay PRO](https://wprelay.com/pricing/)
{% endhint %}

**Downloading the WPRelay Plugin:**&#x20;

There are two ways you can get the WPRelay plugin

1. Purchase Confirmation email: We send this email as soon as you have purchased. The email contains the link to download the latest version of the WPRelay plugin and the license key
2. Your WPRelay Account page: Please go to the [My Account](https://wprelay.com/my-account/) page. Login with your email address and password. Once logged into the My Account page, you will be able to download the latest version of the plugin and also get the license key from the "License" and "Downloads" tab.&#x20;

**Screenshot displaying the download location for the plugin:**

<figure><img src="/files/DMjM3f4AtYZkXt0QexfX" alt=""><figcaption></figcaption></figure>

#### Installation and Activation <a href="#installation-and-activation" id="installation-and-activation"></a>

If you have not yet purchased the plugin, please [Click Here](https://wprelay.com/pricing/) to purchase and download the plugin.&#x20;

1. Please go to your WordPress dashboard -> Plugins -> Add New

<figure><img src="/files/QnsgyFgxg9AzpIHPKg1L" alt=""><figcaption></figcaption></figure>

2. Click on the "Upload Plugin" button at the top

<figure><img src="/files/MuV19w2K0Zz2jvHrYitx" alt=""><figcaption></figcaption></figure>

3. Use the Browse option and choose the downloaded WPRelay plugin zip file.

<figure><img src="/files/ZHXntVm4603NJeI4KKEk" alt=""><figcaption></figcaption></figure>

4\. Click Install Now.

5\. Finally, click the Activate Plugin button.

Once done, you will be able to view the "WPRelay" menu on your left sidebar.<br>

{% hint style="info" %}
Do more with PRO. [Get WPRelay PRO](https://wprelay.com/pricing/).&#x20;
{% endhint %}

**Next Steps:**

**You may also want to check these helpful guides:**

* [Explore this document to learn more about License Key Validation.](https://docs.wprelay.com/installation-and-updates/license-key-validation)
* [Take a look at this useful guide on creating a simple affiliate program.](https://docs.wprelay.com/program-types/creating-simple-affiliate-program)
* [Review this document for methods to become an affiliate.](https://docs.wprelay.com/manage-affiliates/becoming-an-affiliate)

**Still Unclear?**

If you need any assistance, please create a [support request](https://wprelay.com/support/) at our ticket system. We are always happy to assist you :)


# License Activation

Learn how to validate the license key and manage the sites associated with purchase for WPRelay through this documentation.

**License Key is mandatory to receive the automatic updates and support for the plugin.**

{% hint style="info" %}
If you haven't purchased [WPRelay PRO](https://wprelay.com/pricing/) yet, obtain it to receive a license key.
{% endhint %}

#### How to get the license key? <a href="#how-to-get-the-license-keys" id="how-to-get-the-license-keys"></a>

There are two ways you can get license key for WPRelay plugin

1. Purchase Confirmation email : We send this email as soon as you have purchased. The email contains the link to download the latest version of the WPRelay plugin and the license key.
2. Your WPRelay Account page: Please go to [My Account](https://wprelay.com/my-account/) page. Login with your email address and password. Once logged into the My Account page, you will be able to download the latest version of the plugin and also get the license key.

<figure><img src="/files/aH26XeUel9UqHv6Nmd03" alt=""><figcaption></figcaption></figure>

#### How to Validate the License Key? <a href="#how-to-validate-the-license-key" id="how-to-validate-the-license-key"></a>

Once you have obtained the license key, please go to your WordPress dashboard -> WPRelay -> Settings -> License section

Enter your license key and click "Activate" button

<figure><img src="/files/64jUj8yfFU8nXauFbjEm" alt=""><figcaption></figcaption></figure>

**Managing Sites for your License Key**

When you activate the license, we automatically add the site for you and associate it with your license.

In case, you want to add / remove the sites manually for your license key, follow the instructions below to do so:

Go to Wordpress Dashboard -> WPRelay -> Settings -> License

Within the License settings, you'll find the option to deactivate the license key. You can then activate it on the respective domain as needed.

Here's the screenshot for reference:

<figure><img src="/files/CezFJeNd7iiLvqTPzVUn" alt=""><figcaption></figcaption></figure>

Do more with PRO. [Get WPRelay PRO](https://wprelay.com/pricing/).&#x20;

**Next Steps:**

**You may also want to checkout these helpful guides:**

* [Take a look at this useful guides on creating a simple affiliate program.](https://docs.wprelay.com/program-types/creating-simple-affiliate-program)
* [Take a look at these helpful guides on creating Advance affiliate program](https://docs.wprelay.com/program-types/creating-advanced-affiliate-program)
* [Review this document for methods to become an affiliate.](https://docs.wprelay.com/manage-affiliates/becoming-an-affiliate)

**Still could not validate the key?**

Please submit a [support request](https://wprelay.com/support/). We will assist you with the validation.


# Upgrade

Learn how to upgrade the WPRelay plugin from the Free version to the PRO version using this simple guide for the plugin.

{% hint style="info" %}
Haven't yet purchased the WPRelay PRO?&#x20;

[Buy WPRelay PRO](https://wprelay.com/pricing/)
{% endhint %}

Here's a quick overview:

**Page showing free version**

Click on the upgrade option and you will be navigated to our official WPRelay website.

<figure><img src="/files/eBEXUSLKD6j9jjDfze9Q" alt=""><figcaption></figcaption></figure>

**Purchase the Pro Version**:\
Visit the WPRelay website and choose the pro plan that suits your needs. Complete the checkout process to obtain your license key.

<figure><img src="/files/DVMkXdYDOrIRCc6hKKVe" alt=""><figcaption></figcaption></figure>

**Still Unclear?**

If you need any assistance, please create a [support request](https://wprelay.com/support/) in our ticket system. We are always happy to assist you :)


# Introduction

Explore , Discover and Learn how to create various Affiliate programs and how does it works in detail in your Woocommerce store using the WP Relay plugin.

**What is an Affiliate Program ?**

An affiliate program allows businesses to partner with individuals or other businesses (affiliates) who promote their products or services. Affiliates earn commissions for each sale or referral they generate through their unique tracking links or codes.

Affiliates benefit from earning commissions for promoting products or services without the need to create or manage them. Additionally, they can monetize their audience and expand their revenue streams through affiliate partnerships.

{% hint style="info" %}
Please note that before proceeding, you must have installed and activated the WPRelay PRO plugin.

[Get WPRelay PRO](https://wprelay.com/pricing/)
{% endhint %}

**There are two types of Affiliate Program in WPRelay:**

* Simple Program&#x20;
* Advanced Program

**Simple Program -** The Simple Affiliate Program offers a straightforward approach to commissions and discounts. Affiliates can earn a percentage-based, fixed, or no commission. Similarly, their customers can receive a percentage-based, fixed, or no discount. This program is designed to simplify the process of offering incentives to both affiliates and their customers.

**Advanced Program** - The Advanced Affiliate Program introduces a tiered commission structure, which varies based on the number of referrals, total sales amount, or total sales count. Like the Simple Program, it offers percentage-based, fixed, or no discounts to customers. This program is tailored for store owners who wish to implement more sophisticated and varied affiliate strategies.

In the following documentation, we will explore how to set up both simple and advanced programs in [WPRelay](https://wprelay.com/pricing/) and examine their functionalities in detail.

Need some additional assistance ? Please submit a [support request](https://wprelay.com/support/). We are always happy to assist you :)


# Creating a Simple Affiliate Program

Explore and Learn how to create a simple affiliate program for your WooCommerce store using WP Relay plugin from this useful guide.

{% hint style="info" %}
Please note that before proceeding, you must have installed and activated the WPRelay PRO plugin.

[Get WPRelay PRO](https://wprelay.com/pricing/)
{% endhint %}

**Who are Affiliates and what is a Simple Affiliate Program ?**

Affiliates are influencers who promote your site/products and earn a commission for completed sales, benefiting both the affiliates and the site owners.&#x20;

A Simple Affiliate Program allows you to provide affiliates a percentage-based, fixed, or no commission. Similarly, their customers can receive a percentage-based, fixed, or no discount. This program is designed to simplify the process of offering incentives to both affiliates and their customers.


# Get 10% commission on each affiliate sale

Explore and discover how to provide the affiliates with a 10% commission on each sale by creating an Affiliate program using the WP Relay plugin.

**Example scenario:**&#x20;

* Affiliates earn 10% as commission for each sale.

{% hint style="info" %}
To set up the discussed Program, please install and activate "WP Relay PRO". You can obtain [WPRelay PRO Here](https://wprelay.com/pricing/).
{% endhint %}

Let’s take a look at the below example in detail.

**Example Scnerio:** Affiliates earn 10% as commission on each sale

In this setup, if a purchase is made through an affiliate's link or with a coupon code. Then the Affiliate is rewarded with a 10% commission for each sale.&#x20;

To set up this program and make it live or to test it, you need to follow three steps:

* Step 1: Create a Program
* Step 2: Assigning an Affiliate to the program
* Step 3: Use Affiliate link to earn 10% commission.

**Step 1: Creating a Program**

* Go to WordPress backend -> WPRelay -> Manage -> Programs
* Click on the "Create Program" button.

**Program Configuration**

**Program title:** Give a title for the Program. ‘Get 10% commission on each Affiliate sale'.

**Affiliate Commission:** Choose “Simple” as the type of commission and set 10% commission.

**Customer discount:** Choose "No Discount" as the type of discount.

<figure><img src="/files/NTTK1Mflyv8xvdmv0815" alt=""><figcaption></figcaption></figure>

**Step 2: Assigning an Affiliate to the program**

* Go to WordPress backend -> WPRelay -> Affiliates
* Click on the "Create Affiliate" button.

<figure><img src="/files/VVPzvLu6OFiukcKA2Udg" alt=""><figcaption></figcaption></figure>

**Screenshot of Affiliate page -> WPRelay page showing 10% commission earned by an Affiliate after the referrals:**

<figure><img src="/files/t0Ktnl1wfXFmM397Q9BF" alt=""><figcaption></figcaption></figure>

After a successful payment process, The affiliate will receive the 10% commission calculated from the value of order.

{% hint style="info" %}
Admins or store owners, if you adjust customer discounts or modify affiliate programs from the "Affiliate" tab, be aware that updates to Affiliate Coupons (in Woocommerce -> Marketing -> Coupons) may take up to a minute due to changes being applied through a scheduled crone job.
{% endhint %}

Don't have WPRelay yet? Purchase [WPRelay PRO now](https://wprelay.com/pricing/).

**Next Steps:**

**You may also want to check these helpful guides:**

> Still unclear?
>
> If you need any assistance, please create a [support request](https://wprelay.com/support/) in our ticket system. We are always happy to assist you :)


# &#x20;Tiered Commissions


# Creating a Tiered commission for 'Number of referrals' condition.

Learn how to provide Affiliate A with 10% commission when there are 5 or more referrals, and offer customer a 10% discount through an advanced affiliate program

**Example scenario:**&#x20;

* Provide a 10% commission to Affiliate A for sales with 5 or more referrals, while granting their customers a 10% discount on orders.

{% hint style="info" %}
To set up the discussed Program, please install and activate "WPRelay PRO". You can obtain [WPRelay PRO Here](https://wprelay.com/pricing/).
{% endhint %}

Let’s take a look at the below example in detail.

**Example 1: Provide a 10% commission to Affiliate A for sales with 5 or more referrals, while granting their customers a 10% discount on orders.**

In this scenario, when a customer makes a purchase through an affiliate's link or coupon code, they receive a 10% discount. Once the referral count reaches 5, the affiliate earns a 10% commission. This strategy encourages both affiliates and their customers.

To set up this program and make it live or to test it, you need to follow two steps:

* Step 1: Creating a Program&#x20;
* Step 2: Assigning an Affiliate to the program&#x20;

**Step 1: Creating a Program**

* Go to WordPress back end -> WPRelay -> Manage -> Programs&#x20;
* Click on the "Create Program" button.&#x20;

**Here is the screenshot of a program that follows,**&#x20;

**Creating Program:**&#x20;

<figure><img src="/files/U3xkwLecBJRTMC3fu1xb" alt=""><figcaption></figcaption></figure>

**Details of configurations are:**

* **Program title and description** - Give a title and description for the Program. This title will be helpful while selecting the program in the "Affiliates" tab.&#x20;
* You also have the option to specify start and end dates to set validity for the campaigns. &#x20;

**Offering Affiliate Commission:**

<figure><img src="/files/zsBHrMQEVr1xI376SI82" alt=""><figcaption></figcaption></figure>

&#x20;                  &#x20;

**Details of configurations are:**

* **Affiliate Commission type -** choose the commission type as "Advanced"&#x20;
* Here we have three different types of conditions,&#x20;
* Number of referrals: This indicates the number of referrals who have completed a purchase using either an Affiliate link or a coupon code.
* Total Sale Amount: This represents the cumulative expenditure made by customers utilizing either Affiliate links or coupon codes.
* Number of Sale's count: This denotes the total number of sales completed through Affiliates or coupon codes.
* Select "Number of referrals" in the filter and input a value greater than or equal to 5. Then, choose "Percentage" as the discount type and set the payout to 10.
* **Enable recurring options:** This feature allows for granting affiliates commissions per customer, either for their lifetime or solely for the initial X number of orders.

**Offering customer discount:**

<figure><img src="/files/NN5iJFb334c09KPzTUt1" alt=""><figcaption></figcaption></figure>

**Details of configurations are:**

* **Customer Discount Type:** Configure the discount type as "Percentage Discount" and set the value to 10. Additionally, choose among other options such as Fixed Cart, Fixed Product Discount, or No Discount.
* **Free Shipping and Limits:** Within this program, you can offer free shipping to customers. Furthermore, you have the flexibility to establish various constraints such as minimum spending thresholds, limitations on individual coupon usage, exclusions of sale items, and the requirement for specific products or categories to be purchased using the affiliate link to qualify for discounts. These parameters are managed by toggling the "Limits" option.
* **Usage Limit Per User:** By default, this feature is activated with a limit of 1, indicating that customers can utilize the affiliate coupon/discount only once.
* **Saving the Program:** Upon configuring both the affiliate commission and customer discount sections, ensure to click on "Save Program" to activate and preserve the settings.

**Step 2: Assigning an Affiliate to the program**&#x20;

* Go to WordPress back end -> WPRelay -> Affiliates&#x20;
* Click on the "Create Affiliate" button.

<figure><img src="/files/U4RCKhHQvgfAhGAdiwVe" alt=""><figcaption></figcaption></figure>

**Details of configurations are:**&#x20;

* **Program**: Within this segment, you can link an affiliate with a specific program by entering a few characters of the program title to select it.
* **Personal Info:** Here, you can input the affiliate's first name, last name, and email ID.
* To conclude, click on "Save Affiliate" to finalize the procedure.
* **Approving Affiliates:** It is essential to "Approve" affiliates from the pending tab since they are initially designated as pending by default.
* **Affiliate code:** As soon as admin approves the affiliate, the affiliate link, and coupon will get auto-generated and [emailed to Affiliates](https://docs.wprelay.com/settings/email-notification-for-affiliates-and-their-settings).&#x20;
* **Managing WooCommerce Accounts**: While processing the "Approval," if the affiliate lacks a pre-existing WooCommerce customer account, you'll be able to generate one. Following the creation of a WooCommerce account for the affiliate, they will receive a password reset email via WooCommerce.

{% hint style="info" %}
If affiliates utilize the Affiliate Registration Form for registration, they will be listed under the "Pending" status within the Affiliates Tab. When approving these affiliates, you'll also be able to allocate a Program to them.&#x20;

Moreover, you retain the flexibility to modify the Program linked with an affiliate anytime from the Affiliates tab.
{% endhint %}

**Let's see how to test this affiliate program as a new customer:**

**The cart page displays a 10% discount for the customer when a purchase is made via the affiliate's link:**&#x20;

<figure><img src="/files/RsYiXa20q9upj9JQyk3e" alt=""><figcaption></figcaption></figure>

After 5 different customers complete their orders through affiliate link A, the affiliate will receive a 10% commission calculated from the total amount of the customer's order.

**Screenshot of Myaccount -> WPRelay page showing commission earned by an Affiliate A:**

<figure><img src="/files/aAcqegWt6nwX6YeWKFkK" alt=""><figcaption></figcaption></figure>

{% hint style="info" %}
Admins or store owners, if you adjust customer discounts or modify affiliate programs from the "Affiliate" tab, be aware that updates to Affiliate Coupons (in Woocommerce -> Marketing -> Coupons) may take up to a minute due to changes being applied through a scheduled cron job.
{% endhint %}

Don't have WPRelay yet? Purchase [WPRelay PRO now](https://wprelay.com/pricing/).

**Next Steps:**

**You may also want to check these helpful guides:**

* [Understanding the process of setting up Simple Affiliate Programs.](https://docs.wprelay.com/program-types/creating-simple-affiliate-program)
* [Familiarize yourself with the setup of an Affiliate Registration Form.](https://docs.wprelay.com/manage-affiliates/creating-an-affiliate-registration-form)
* [Learning how to configure the General Settings page.](https://docs.wprelay.com/settings/general-settings)

> Still unclear?
>
> If you need any assistance, please create a [support request](https://wprelay.com/support/) in our ticket system. We are always happy to assist you :)


# Creating a Tiered commission for 'Total sale amount' condition.

Discover how to provide Affiliate B with a life time 5% commission when sales amount exceeds 1000, and offer customers a one-time $5 discount through an advanced affiliate program.

**Example scenario:**&#x20;

* Provide a lifetime 5% commission to Affiliate B when the sales amount exceeds 1000 while granting customers a one-time $5 discount on orders.

{% hint style="info" %}
To set up the discussed Program, please install and activate "WPRelay PRO". You can obtain [WPRelay PRO Here](https://wprelay.com/pricing/).
{% endhint %}

**Example 2: Provide a lifetime 5% commission to Affiliate B when the sales amount exceeds 1000 while granting customers a one-time $5 discount on orders.**

In this scenario, when a customer makes a purchase through an affiliate's link or coupon code, they receive a one-time $5 discount. When the sales amount exceeds 1000, the affiliate earns a 10% commission. This strategy encourages both affiliates and their customers.

To set up this program and make it live or to test it, you need to follow two steps:

* Step 1: Creating a Program&#x20;
* Step 2: Assigning an Affiliate to the program&#x20;

**Step 1: Creating a Program**

* Go to WordPress back end -> WPRelay -> Manage -> Programs&#x20;
* Click on the "Create Program" button.&#x20;

**Here is the screenshot of a program that follows,**&#x20;

**Creating Program:**&#x20;

<figure><img src="/files/t0dv2h6nKqfQqPWMGR3v" alt=""><figcaption></figcaption></figure>

**Details of configurations are:**

* **Program title and description** - Give a title and description for the Program. This title will be helpful while selecting the program in the "Affiliates" tab.&#x20;
* You also have the option to specify start and end dates to set validity for the campaigns. &#x20;

**Offering Affiliate Commission:**&#x20;

<figure><img src="/files/3x0jIRgb7GdxMbVW0KmL" alt=""><figcaption></figcaption></figure>

**Details of configurations are:**

* **Affiliate Commission type -** choose the commission type as "Advanced"&#x20;
* Here we have three different types of conditions,&#x20;
* Number of referrals: This indicates the number of referrals who have completed a purchase using either an Affiliate link or a coupon code.
* Total Sale Amount: This represents the cumulative expenditure made by customers utilizing either Affiliate links or coupon codes.
* Number of Sale's count: This denotes the total number of sales completed through Affiliates or coupon codes.
* Select "Total Sale Amount" in the filter and input a value greater than or equal to 1000. Then, choose "Percentage" as the discount type, set the payout to 5, and choose USD as the currency type, you can also have any of the currency.
* **Enable recurring options** - enable this checkbox and select "Lifetime" to provide a 5% commission for all orders placed by a customer for a lifetime. Alternatively, you can choose "X Number of Orders" and set a value (e.g., 5), allowing the affiliate to earn commission on the first 5 orders plus the initial customer order, totaling 6.

**Offering customer discount:**

<figure><img src="/files/AN0xusD7827v8iMaGmRu" alt=""><figcaption></figcaption></figure>

**Details of configurations are:**

* **Customer Discount Type:** Configure the discount type as "Percentage Discount" and set the value to 10. Additionally, choose among other options such as Fixed Cart, Fixed Product Discount, or No Discount.
* **Free Shipping and Limits:** Within this program, you can offer free shipping to customers. Furthermore, you have the flexibility to establish various constraints such as minimum spending thresholds, limitations on individual coupon usage, exclusions of sale items, and the requirement for specific products or categories to be purchased using the affiliate link to qualify for discounts. These parameters are managed by toggling the "Limits" option.
* **Usage Limit Per User:** By default, this feature is activated with a limit of 1, indicating that customers can utilize the affiliate coupon/discount only once.
* **Saving the Program:** Upon configuring both the affiliate commission and customer discount sections, ensure to click on "Save Program" to activate and preserve the settings.

**Step 2: Assigning an Affiliate to the program**&#x20;

* Go to WordPress back end -> WPRelay -> Affiliates&#x20;
* Click on the "Create Affiliate" button.

<figure><img src="/files/sHge2B7t2PgrsR4JpRXo" alt=""><figcaption></figcaption></figure>

**Details of configurations are:**&#x20;

* **Program**: Within this segment, you can link an affiliate with a specific program by entering a few characters of the program title to select it.
* **Personal Info:** Here, you can input the affiliate's first name, last name, and email ID.
* To conclude, click on "Save Affiliate" to finalize the procedure.
* **Approving Affiliates:** It is essential to "Approve" affiliates from the pending tab since they are initially designated as pending by default.
* **Affiliate code:** As soon as admin approves the affiliate, the affiliate link, and coupon will get auto-generated and [emailed to Affiliates](https://docs.wprelay.com/settings/email-notification-for-affiliates-and-their-settings).&#x20;
* **Managing WooCommerce Accounts**: While processing the "Approval," if the affiliate lacks a pre-existing WooCommerce customer account, you'll be able to generate one. Following the creation of a WooCommerce account for the affiliate, they will receive a password reset email via WooCommerce.

{% hint style="info" %}
If affiliates utilize the Affiliate Registration Form for registration, they will be listed under the "Pending" status within the Affiliates Tab. When approving these affiliates, you'll also be able to allocate a Program to them.&#x20;

Moreover, you retain the flexibility to modify the Program linked with an affiliate anytime from the Affiliates tab.
{% endhint %}

**Let's see how to test this affiliate program as a new customer:**

**The cart page displays a $5 discount for the customer when a purchase is made via the affiliate's link:**&#x20;

<figure><img src="/files/6qgqHktZeCc0LXcwNvZo" alt=""><figcaption></figcaption></figure>

After the customers complete their orders that exceed $1000 through affiliate link A, the affiliate will receive a 5% commission calculated from the total amount of the customer's order.

**Screenshot of Myaccount -> WPRelay page showing commission earned by an Affiliate A:**

<figure><img src="/files/jePqgYuGpF7uSc0rU8bM" alt=""><figcaption></figcaption></figure>

{% hint style="info" %}
As an administrator or store owner, when you update the discount value for a customer within an existing "Program" or modify the "Program" associated with a specific affiliate from the "Affiliate" tab, please note that updates to Affiliate Coupons (located under Woocommerce -> Marketing -> Coupons) may take up to a minute. This is due to changes being applied via a scheduled cron job.
{% endhint %}

Don't have WPRelay yet? Purchase [WPRelay PRO now](https://wprelay.com/pricing/).

**Next Steps:**

**You may also want to check these helpful guides:**

* [Understanding the process of setting up Simple Affiliate Programs.](https://docs.wprelay.com/program-types/creating-simple-affiliate-program)
* [Familiarize yourself with the setup of an Affiliate Registration Form.](https://docs.wprelay.com/manage-affiliates/creating-an-affiliate-registration-form)
* [Learning how to configure the General Settings page.](https://docs.wprelay.com/settings/general-settings)

> Still unclear?
>
> If you need any assistance, please create a [support request](https://wprelay.com/support/) in our ticket system. We are always happy to assist you :)


# Creating a Tiered commission for 'Number of sales count' condition.

Discover offering Affiliate C tiered commissions (10%, 15%, 20%) for sales thresholds (5, 10, 15+), and a 5% discount for customers buying product A via a simple affiliate program.

**Example scenario:**&#x20;

* Provide a 10% commission when the number of sales is 5 or more, 15% when the number of sales is 10 or more, and 20% when the number of sales is 15 or more. Customers buying product A through the basic affiliate program get an exclusive 5% discount.

{% hint style="info" %}
To set up the discussed Program, please install and activate "WPRelay PRO". You can obtain [WPRelay PRO Here](https://wprelay.com/pricing/).
{% endhint %}

**Example 3: Provide a 10% commission when the number of sales is 5 or more, 15% when the number of sales is 10 or more, and 20% when the number of sales is 15 or more. Customers buying product A through the basic affiliate program get an exclusive 5% discount.**

In this setup, customers get a 5% discount when they buy through an affiliate's link or coupon code. As the sales count exceeds 5, affiliates earn a 10% commission; exceeding 10 results in a 15% commission, and exceeding 15 leads to a 20% commission. This approach motivates both affiliates and their customers.

To set up this program and make it live or to test it, you need to follow two steps:

* Step 1: Creating a Program&#x20;
* Step 2: Assigning an Affiliate to the program&#x20;

**Step 1: Creating a Program**

* Go to WordPress back end -> WPRelay -> Manage -> Programs&#x20;
* Click on the "Create Program" button.&#x20;

**Here is the screenshot of a program that follows,**&#x20;

**Creating Program:**&#x20;

<figure><img src="/files/8b9yKknsxqIA2E5rwArQ" alt=""><figcaption></figcaption></figure>

**Details of configurations are:**

* **Program title and description** - Give a title and description for the Program. This title will be helpful while selecting the program in the "Affiliates" tab.&#x20;
* You also have the option to specify start and end dates to set validity for the campaigns. &#x20;

**Offering Affiliate Commission:**&#x20;

<figure><img src="/files/gTXcFahxcWW9aKdnW5uf" alt=""><figcaption></figcaption></figure>

**Details of configurations are:**

* **Affiliate Commission type -** choose the commission type as "Advanced"&#x20;
* Here we have three different types of conditions,&#x20;
* Number of referrals: This indicates the number of referrals who have completed a purchase using either an Affiliate link or a coupon code.
* Total Sale Amount: This represents the cumulative expenditure made by customers utilizing either Affiliate links or coupon codes.
* Number of Sale's count: This denotes the total number of sales completed through Affiliates or coupon codes.
* Choose "Number of Sale's count" in the filter, enter a value of 5 or more, and pay 10%. Then, add another tier, set the value to 10 or more, and pay 15%. Lastly, add a third tier, set the value to 15 or more, and pay 20%.
* **Enable recurring options:** This feature allows for granting affiliates commissions per customer, either for their lifetime or solely for the initial X number of orders.

**Offering customer discount:**

<figure><img src="/files/JS8CgGeqA3HatkRCt3OY" alt=""><figcaption></figcaption></figure>

**Details of configurations are:**

**Customer Discount Type** - Choose the discount type as "Percentage Discount" and set it to 5%. Alternatively, choose from Fixed Cart, Fixed Product Discount, or No Discount.

**Free Shipping** - Provide customers with the option of free shipping through this Program.

**Limits** - Activate the toggle and add Product A to the list of items. Customers must purchase these products via the coupon or affiliate link to receive a 5% discount. Additionally, set various restrictions such as minimum spend requirements, individual coupon usage limits, exclusions for sale items, and conditions specifying that certain products or categories must be purchased through the affiliate link to qualify for discounts.

**Usage Limit Per User** - By default, this toggle is enabled and set to 1, allowing customers to utilize the affiliate coupon/discount only once.

**Saving the Program** - Upon successfully configuring both affiliate commission and customer discount sections, click "Save Program" to activate and store it.

**Step 2: Assigning an Affiliate to the program**&#x20;

* Go to WordPress back end -> WPRelay -> Affiliates&#x20;
* Click on the "Create Affiliate" button.

<figure><img src="/files/8P1zFtYPFRCAfy0m3L21" alt=""><figcaption></figcaption></figure>

**Details of configurations are:**&#x20;

* **Program**: Within this segment, you can link an affiliate with a specific program by entering a few characters of the program title to select it.
* **Personal Info:** Here, you can input the affiliate's first name, last name, and email ID.
* To conclude, click on "Save Affiliate" to finalize the procedure.
* **Approving Affiliates:** It is essential to "Approve" affiliates from the pending tab since they are initially designated as pending by default.
* **Affiliate code:** As soon as admin approves the affiliate, affiliate link and coupon will get auto generated and [emailed to Affiliates](https://docs.wprelay.com/settings/email-notification-for-affiliates-and-their-settings).&#x20;
* **Managing WooCommerce Accounts**: While processing the "Approval," if the affiliate lacks a pre-existing WooCommerce customer account, you'll be able to generate one. Following the creation of a WooCommerce account for the affiliate, they will receive a password reset email via WooCommerce.

{% hint style="info" %}
If affiliates utilize the Affiliate Registration Form for registration, they will be listed under the "Pending" status within the Affiliates Tab. When approving these affiliates, you'll also be able to allocate a Program to them.&#x20;

Moreover, you retain the flexibility to modify the Program linked with an affiliate anytime from the Affiliates tab.
{% endhint %}

**Let's see how to test this affiliate program as a new customer:**

**The cart page displays a 10% discount for the customer when a purchase is made via the affiliate's link:**&#x20;

<figure><img src="/files/VHhT1twTTYRZNK5xhB8T" alt=""><figcaption></figcaption></figure>

Once 5 orders are successfully completed via affiliate link A, the affiliate earns a 10% commission based on the total order amount. This process repeats recursively based on the tier.

**Screenshot of Myaccount -> WPRelay page showing commission earned by an Affiliate A:**

<figure><img src="/files/m2CNExKDSfo8s2ReXvGL" alt=""><figcaption></figcaption></figure>

{% hint style="info" %}
As an administrator or store owner, when you update the discount value for a customer within an existing "Program" or modify the "Program" associated with a specific affiliate from the "Affiliate" tab, please note that updates to Affiliate Coupons (located under Woocommerce -> Marketing -> Coupons) may take up to a minute. This is due to changes are applied via a scheduled cron job.
{% endhint %}

Don't have WPRelay yet? Purchase [WPRelay PRO now](https://wprelay.com/pricing/).

**Next Steps:**

**You may also want to check these helpful guides:**

* [Understanding the process of setting up Simple Affiliate Programs.](https://docs.wprelay.com/program-types/creating-simple-affiliate-program)
* [Familiarize yourself with the setup of an Affiliate Registration Form.](https://docs.wprelay.com/manage-affiliates/creating-an-affiliate-registration-form)
* [Learning how to configure the General Settings page.](https://docs.wprelay.com/settings/general-settings)

**Example 2:** <br>

{% embed url="<https://youtu.be/Wndl_9vQGXY>" %}

> Still unclear?
>
> If you need any assistance, please create a [support request](https://wprelay.com/support/) in our ticket system. We are always happy to assist you :)


# Create a Simple Customer Referral Program

Learn how to create an advanced Affiliate referral programs for your WooCommerce store using the WP Relay plugin from this simple guide.

**Who are Affiliates and what does the Advanced Affiliate Program entail?**

Affiliates refer to influencers engaged in promoting your site or products and earning commissions upon successful sales, creating mutual benefits for both affiliates and site owners.

The Advanced Affiliate Program facilitates the provision of percentage and fixed discounts to affiliates and their customers upon meeting certain conditions. This feature empowers store owners to offer clear-cut discounts to both affiliates and their clientele.


# Give $10 Get $10 referral program.

Learn how to offer $10 commission for affiliate A and $10 discount for customers via a simple affiliate program.

**Example scenario:**&#x20;

* Provide a $10 commission for each affiliate sale  (Affiliate), with their customers receiving a $10 discount on their orders.&#x20;

{% hint style="info" %}
To setup the discussed Program, please install and activate "WPRelay PRO". You can obtain [WPRelay PRO Here](https://wprelay.com/pricing/).
{% endhint %}

Now, let’s take a look at the below example in detail.

**Example 1: Provide a $10 commission for each affiliate sale  (Affiliate), with their referrals/customers receiving a $10 discount on their orders.**&#x20;

In this scenario, when a customer makes a purchase using an affiliate's link or coupon code, the affiliate earns a 10$ commission, and the customer receives a 10$ discount. This approach motivates both affiliates and their customers.

To set up this program and make it live or to test, you need to follow two steps:

* Step 1: Creating a Program&#x20;
* Step 2: Assigning an Affiliate to the program&#x20;

**Step 1: Creating a Program**

* Go to Wordpress back end -> WPRelay -> Manage -> Progarms&#x20;
* Click on "Create Program" button.&#x20;

**Here is the screenshot of program that follows,**&#x20;

**Creating Program:**&#x20;

<figure><img src="/files/0v9sG40d7YRxy4GfCduF" alt=""><figcaption></figcaption></figure>

**Details of configurations are:**

* **Program title and description** - Give a title and description for the Program. This title will be helpful while selecting the program in "Affiliates" tab.&#x20;
* You also have the option to specify start and end date to set validity for the campaigns. &#x20;

**Offering Affiliate Commission:**&#x20;

<figure><img src="/files/RpB1Gg3dt8SgC8WfU6jO" alt=""><figcaption></figcaption></figure>

**Details of configurations are:**

* **Affiliate Commission type -** choose the commission type as "Simple"&#x20;
* Set the "Percentage Per Sale" as 10. You also have other options available like Fixed  or No Commission (If "Advanced" is chosen as the commission type, the offering will vary, such as "Number of Referrals per affiliate/ amount," which provides Tiered Commissions or more flexibility).&#x20;
* **Enable recurring options** - enable this checkbox and select "Lifetime" to provide a 5% commission for all orders placed by a customer for lifetime. Alternatively, you can choose "X Number of Orders" and set a value (e.g., 5), allowing the affiliate to earn commission on the first 5 orders plus the initial customer order, totalling 6.

**Offering customer discount:**

<figure><img src="/files/suTzs9pPuxB8SjhCa8M7" alt=""><figcaption></figcaption></figure>

**Details of configurations are:**

* **Customer Discount Type** - choose the discount type as "Fixed cart Discount" and set the value as 10. You also have other options to set like Fixed Cart, Fixed Product Discount or No Discount.&#x20;
* **Free Shipping and Limits:** You have the option to offer free shipping to customers through this Program. Additionally, you can set various limits such as minimum spend, individual coupon usage, excluding sale items, and the requirement for specific products or categories to be purchased using the affiliate link to receive discounts. This is managed by enabling the "Limits" toggle.
* **Usage Limit Per User**: By default, this toggle is enabled and set to 1, meaning customers can only use the affiliate coupon/discount once.
* **Saving the Program**: After successfully configuring the program with both affiliate commission and customer discount sections, click on "Save Program" to activate and save it.

**Step 2: Assigning an Affiliate to the program**&#x20;

* Go to Wordpress back end -> WPRelay -> Affiliates&#x20;
* Click on "Create Affiliate" button.

<figure><img src="/files/ZbOsECCL1spYqAGqKA93" alt=""><figcaption></figcaption></figure>

**Details of configurations are:**&#x20;

* **Program:** In this section, associate an affiliate with a specific program by typing a few characters of the program title to select it.&#x20;
* **Personal Info:** Under this section, you can enter the first name, last name, and email ID of the affiliate.&#x20;
* Finally, click on "Save Affiliate" to complete the process.
* **Approving Affiliates** - Ensure to "Approve" the affiliate from the pending tab, as affiliates are initially set to pending status by default.
* **Affiliate code:** As soon as admin approves the affiliate, affiliate link and coupon will get auto generated and [emailed to Affiliates](https://docs.wprelay.com/settings/email-notification-for-affiliates-and-their-settings).&#x20;
* **Managing WooCommerce Accounts** - During the "Approval" process, if the affiliate does not already have a WooCommerce customer account, you'll have the opportunity to create one. Upon creating a WooCommerce account for the affiliate, a password reset email will be sent to them via WooCommerce.

{% hint style="info" %}

* If affiliates register through the Affiliate Registration Form, they will appear in the "Pending" status under the Affiliates Tab. When approving these affiliates, you will also have the option to assign a Program to them.&#x20;
* Additionally, you can change the Program associated with an affiliate at any time from the Affiliates tab.
  {% endhint %}

When a customer makes a purchase using an affiliate link or coupon code, the affiliate earns a 10% commission on the successful transaction, and the customer also receives a 10% discount on their purchase.

**Let's see how to test this affiliate program as a new customer:**

**Cart page displays a $10 discount for the customer when a purchase is made via the affiliate's link:**&#x20;

<figure><img src="/files/CHxaLhDcgvubjH7UGtMg" alt=""><figcaption></figcaption></figure>

After a customer completes an order through affiliate link A, the affiliate will receive a $10 commission calculated from the total amount of the customer's order.

**Screenshot of Myaccount -> WPRelay page showing commission earned by an Affiliate A:**

<figure><img src="/files/VM9fNY5sNJwW6J5Abd4H" alt=""><figcaption></figcaption></figure>

{% hint style="info" %}
As an administrator or store owner, when you update the discount value for a customer within an existing "Program" or modify the "Program" associated with a specific affiliate from the "Affiliate" tab, please note that updates to Affiliate Coupons (located under Woocommerce -> Marketing -> Coupons) may take up to a minute. This is due to changes are applied via a scheduled cron job.
{% endhint %}

Don't have WPRelay yet? Purchase [WPRelay PRO now](https://wprelay.com/pricing/).

**Next Steps:**

**You may also want to check out these helpful guides:**

* [For more information about the Affiliate Registration Page, please refer to this document.](https://docs.wprelay.com/manage-affiliates/creating-an-affiliate-registration-form)
* [Explore this guide to learn about various methods to become an affiliate.](https://docs.wprelay.com/manage-affiliates/becoming-an-affiliate)
* [For details on the emails provided through WPRelay, please consult this resource.](https://docs.wprelay.com/settings/email-notification-for-affiliates-and-their-settings)\ <br>

**Similar example:  "Give 10$, Get 10$"** <br>

{% embed url="<https://youtu.be/7XDznSjfQHc>" %}

**Still Unclear ?**

If you need any assistance, please create a [support request](https://wprelay.com/support/) at our ticket system. We are always happy to assist you :)


# Program

Learn and discover how to create Affiliate Programs and assign various types of commissions to the affiliate and offers to the customers using the WP Relay plugin


# Creating a Program

Learn how to create and configure a Program for the Affiliates using the WP Relay plugin.

#### **Create a New Program**

* **Step 1** : Navigate to **WP Relay > Programs**.

<figure><img src="/files/RGswm5FllibjN7DmGfcG" alt=""><figcaption></figcaption></figure>

* **Step 2: Click** **Add New Program**.

<figure><img src="/files/IVliw3dWSEWV5UoEyBCx" alt=""><figcaption></figcaption></figure>

{% hint style="info" %}
Admins or store owners, if you adjust customer discounts or modify affiliate programs from the "Affiliate" tab, be aware that updates to Affiliate Coupons (in Woocommerce -> Marketing -> Coupons) may take up to a minute due to changes being applied through a scheduled cron job.
{% endhint %}

Don't have WPRelay yet? Purchase [WPRelay PRO now](https://wprelay.com/pricing/).

**Still Unclear?**

If you need any assistance, please create a [support request](https://wprelay.com/support/) at our ticket system. We are always happy to assist you :)


# Commissions

Learn and explore on how to create different types of Commissions for the affiliates using the WP Relay plugin to boost the sales in your store.

An affiliate commission is the compensation earned by an affiliate for promoting a business and driving sales, leads, or traffic through their referral link or specific promotional efforts. This commission is usually calculated as a percentage of the sale price or as a fixed amount per qualifying action, depending on the terms of the affiliate program.

I**n the following documentation, we will explore how to set up Simple, Tiered and Rule-based Commissions in** [**WPRelay**](https://wprelay.com/pricing/) **and examine their functionalities in detail.**


# Simple Commission

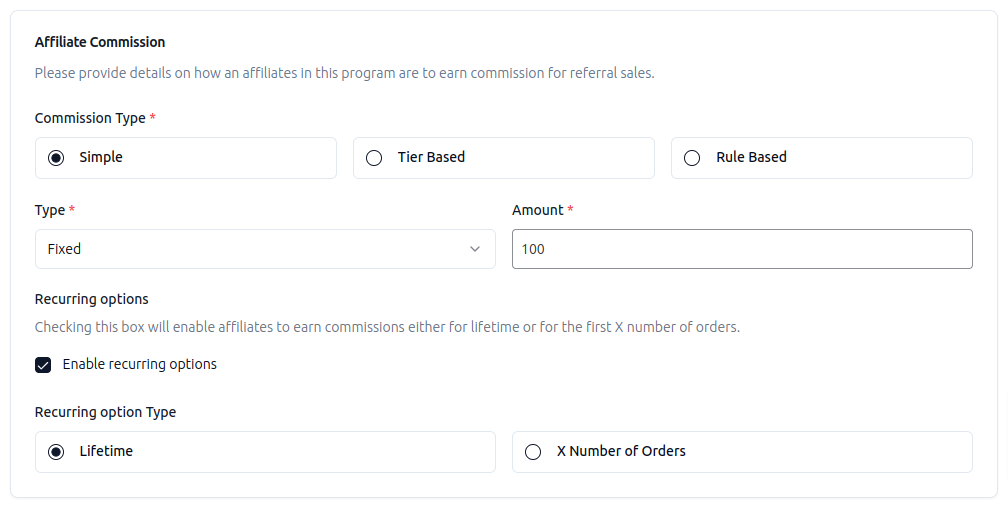
**Simple Commission** in affiliate marketing refers to a straightforward commission structure where affiliates earn a fixed percentage or flat amount for every sale, lead, or action they refer. It does not involve complex tiers, bonuses, or multi-level calculations—making it easy to track and understand.

For example, if an affiliate earns a 10% simple commission on sales, and a referred customer makes a $100 purchase, the affiliate receives $10.

Simple commissions provide affiliates with a fixed payout for each sale or action they refer, offering a straightforward and predictable earning structure without requiring them to meet specific sales targets or thresholds.

**EXAMPLES**

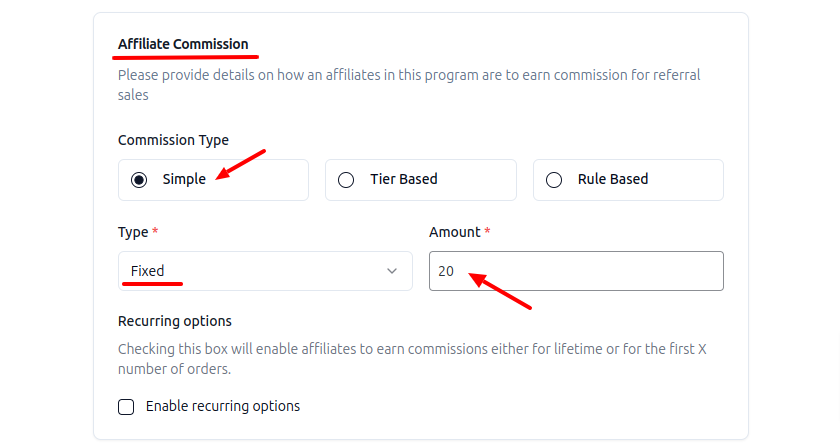
**(i) To set a fixed commission type in a simple affiliate program,**

* Commission type -> Simple
* Then select the type “Fixed”
* In the amount section, enter the commission amount you want to pay to the affiliate.

<figure><img src="https://wprelay.com/wp-content/uploads/2024/09/Setting-affiliate-commission-rate-as-fixed.png" alt="Setting affiliate commission rate as fixed" height="448" width="840"><figcaption></figcaption></figure>

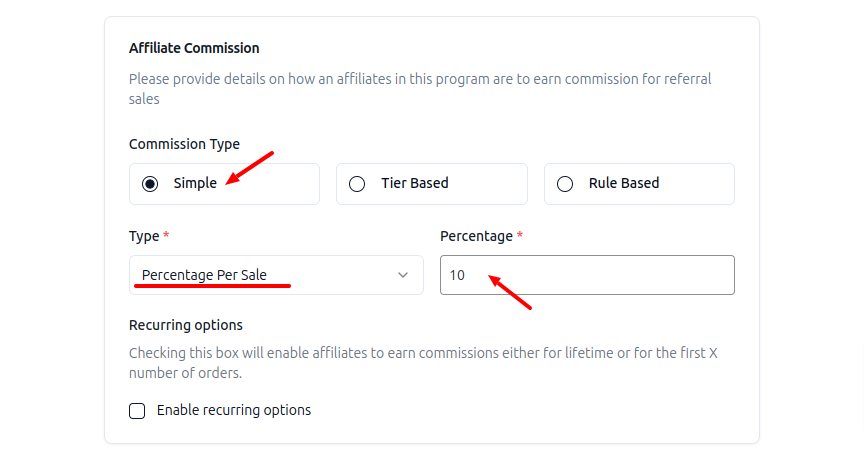
(ii) To set percentage commission type in a simple affiliate program,

* Commission type -> Simple
* Then select the type “percentage per sale”
* In the percentage section, enter the percentage of commission you want to pay to the affiliate.

<figure><img src="https://wprelay.com/wp-content/uploads/2024/09/Setting-commission-rates-for-affiliates-as-percentage-per-sale-using-WPrelay.png" alt="Setting commission rates for affiliates as percentage per sale using WPrelay" height="458" width="864"><figcaption></figcaption></figure>

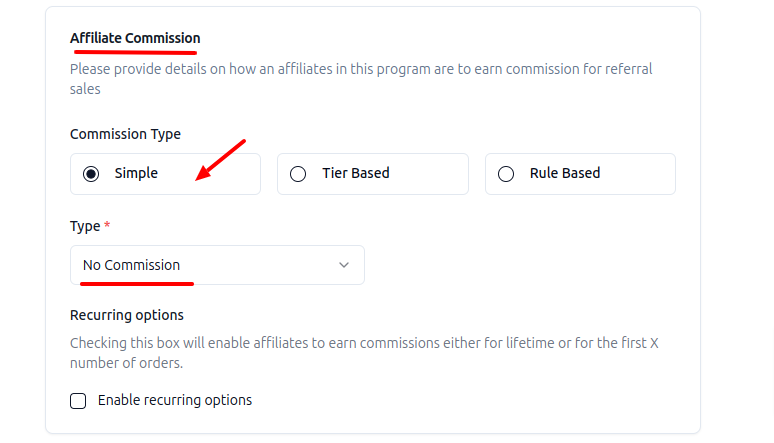
(iii) To set no commission type in a simple affiliate program,

* Commission type -> Simple
* Then select the type “no commission”

<figure><img src="https://wprelay.com/wp-content/uploads/2024/09/Setting-commission-rates-for-affiliates-as-no-commission-using-WPrelay.png" alt="Setting commission rates for affiliates as no commission using WPrelay" height="443" width="774"><figcaption></figcaption></figure>

Need some additional assistance ? Please submit a [support request](https://wprelay.com/support/). We are always happy to assist you :)


# Tiered Based Commission

**Tiered Based Commission** is an advanced affiliate commission plan where affiliates are paid based on the volume of sales they generate. You might determine a fixed number of sales and increase your commission rates for affiliates accordingly.

For example, offer a 5% commission for the first 10 sales, increasing to 10% for the next 20 sales, and 15% for any sales beyond that.

Tiered commissions encourage affiliates to increase their efforts to reach higher commission tiers by achieving a pre-fixed number of sales.

**EXAMPLES**

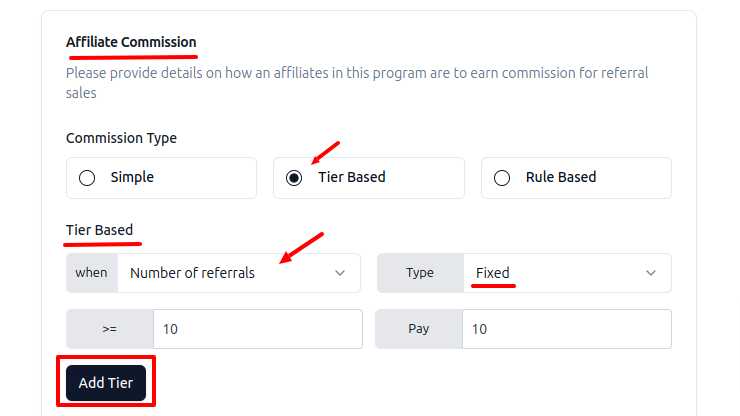
**(i) To set tier-based affiliate marketing commission rate based on the number of referrals,**

* Commission type -> Tier based
* Select ‘Number of referrals’ under “when” in the tier-based section.
* Then choose the ‘Fixed’ or ‘Percentage’ commission type according to your commission plan.
* Enter the commission rate or percentage for the number of referrals.

If you want to add multiple tier systems to your WooCommerce affiliate marketing program, Click on ‘Add tier’ and fix commission rates.

<figure><img src="https://wprelay.com/wp-content/uploads/2024/09/Setting-affiliate-payout-rates-for-number-of-referrals.png" alt="Setting affiliate payout rates for number of referrals" height="420" width="702"><figcaption></figcaption></figure>

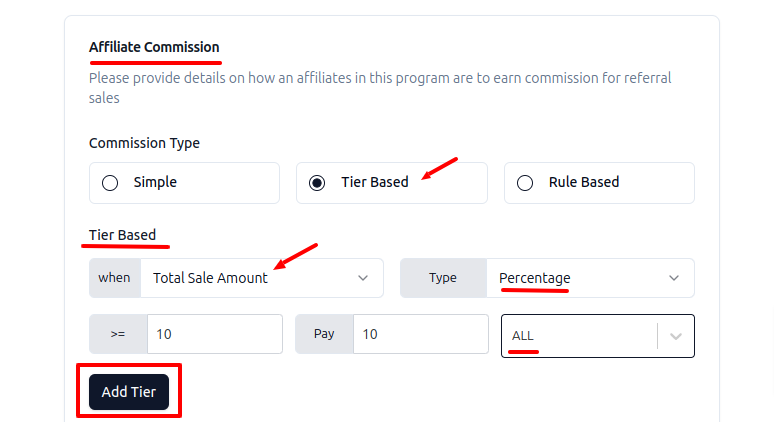
**(ii) To set tier-based affiliate program commission rates based on total sale amount,**

* Commission type -> Tier based
* Select ‘Total sale amount’ under “when” in the tier-based section.
* Then choose the ‘Fixed’ or ‘Percentage’ commission type according to your commission plan.
* Enter the commission rate or percentage for the total sale amount.
* Select the currency type of your choice from the ‘Select currency’ drop-down.

Click on ‘Add tier’ if you want to add multiple tier systems to your WooCommerce affiliate program.

<figure><img src="https://wprelay.com/wp-content/uploads/2024/09/Setting-affiliate-payout-rates-for-total-sale-amount.png" alt="Setting affiliate payout rates for total sale amount" height="422" width="774"><figcaption></figcaption></figure>

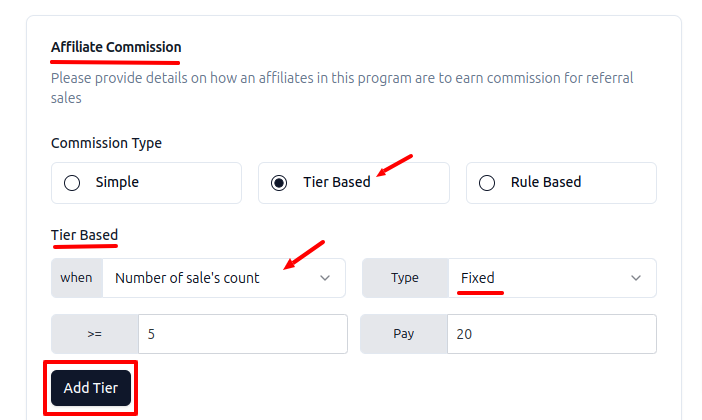
**(iii) To set tiered commission rates for affiliates based on the number of sale’s count,**

* Commission type -> Tier based
* Select ‘Number of sale’s count’ under “when” in the tier-based section.
* Then choose the ‘Fixed’ or ‘Percentage’ commission type according to your commission structure for affiliates.
* Enter the commission rate or percentage for the number of sale’s count.

Click on ‘Add tier’ if you want to add multiple tier systems to your WooCommerce program.

<figure><img src="https://wprelay.com/wp-content/uploads/2024/09/Setting-affiliate-payout-rates-for-number-of-sales-count.png" alt="Setting affiliate payout rates for number of sale’s count" height="416" width="740"><figcaption></figcaption></figure>

Do more with PRO. [Get WPRelay PRO](https://wprelay.com/pricing/).&#x20;

**Still Unclear?**

If you need any assistance, please create a [support request](https://wprelay.com/support/) at our ticket system. We are always happy to assist you :)

<br>


# Rule-Based Commission

Rule-Based Commission is an affiliate program offers advanced configuration settings where you will find more sophisticated setup options. It is a per-line item choice commission type and it does not apply to the order total.

Store owners who want to implement diverse affiliate strategies can take advantage of the extensive configuration options provided by the rule-based affiliate program.

Additionally, Wprelay provides options to set affiliate commission rates based on product / category.

**Note**: The rule tab will be enabled only after a program is created.

To Create a Rule-Based Commission Type,

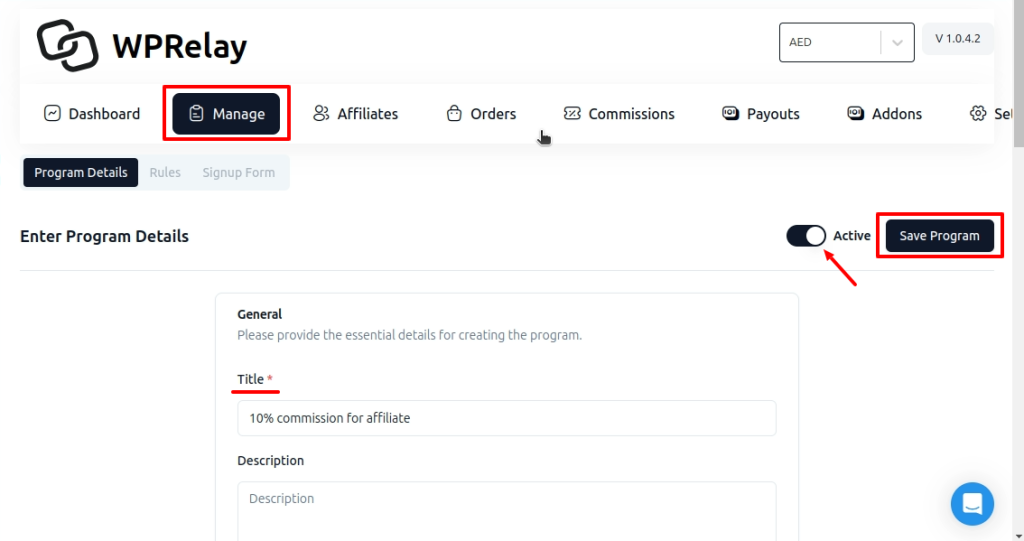
* Go to WPrelay dashboard -> Manage -> Create program
* Enter the title and description to create an affiliate program
* Commission type -> rule-based
* Save program

<figure><img src="https://wprelay.com/wp-content/uploads/2024/09/Creating-an-affiliate-program-1-1024x541.png" alt="Creating an affiliate program" height="541" width="1024"><figcaption></figcaption></figure>

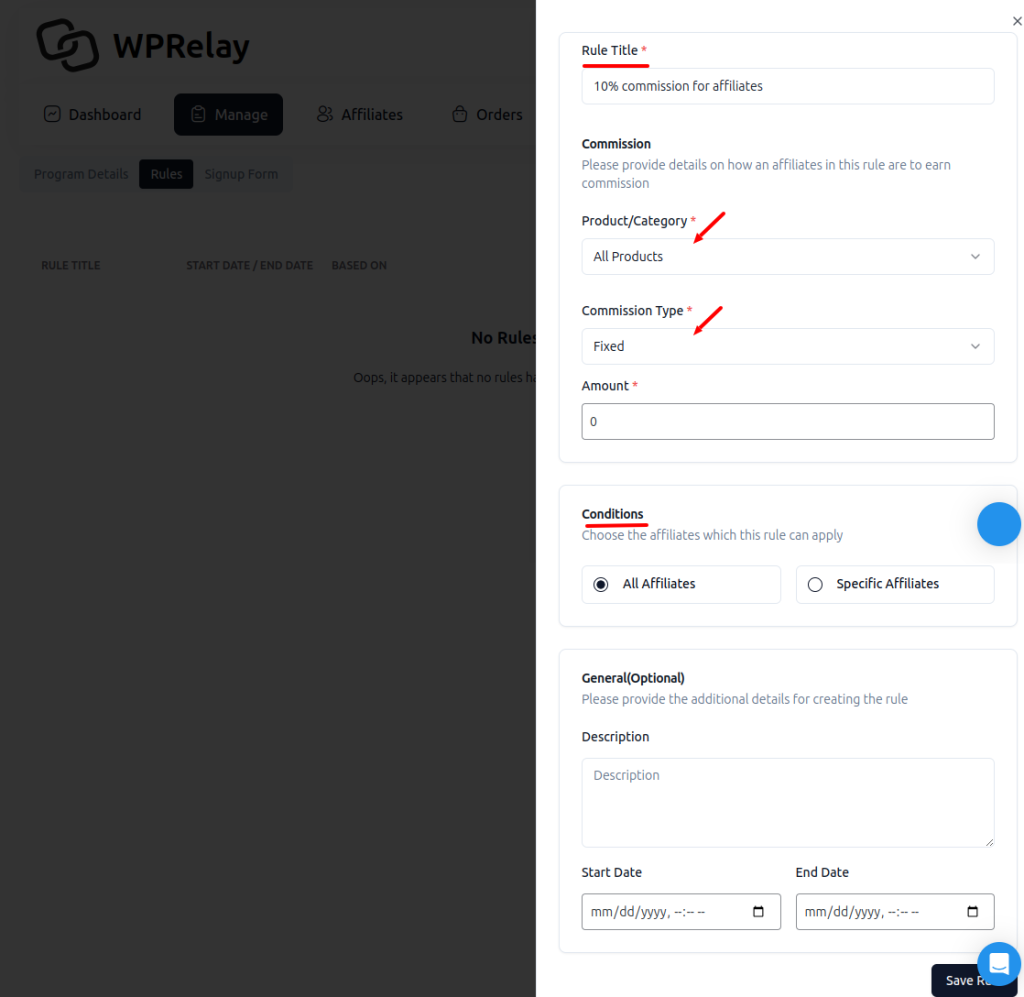
(i) To set affiliate commission rates for all products,

* Go to manage -> Rules -> Add Rule
* Enter rule title
* Select ‘All Products’ in the product/category section
* Then choose ‘Fixed’ or ‘Percentage’ according to your commission plan.
* From the conditions, select ‘ All affiliates’ or ‘specific affiliate’ as per your preference.

<figure><img src="https://wprelay.com/wp-content/uploads/2024/09/Setting-affiliate-commission-rates-for-all-products-using-WPrelay-1024x997.png" alt="Setting affiliate commission rates for all products using WPrelay" height="997" width="1024"><figcaption></figcaption></figure>

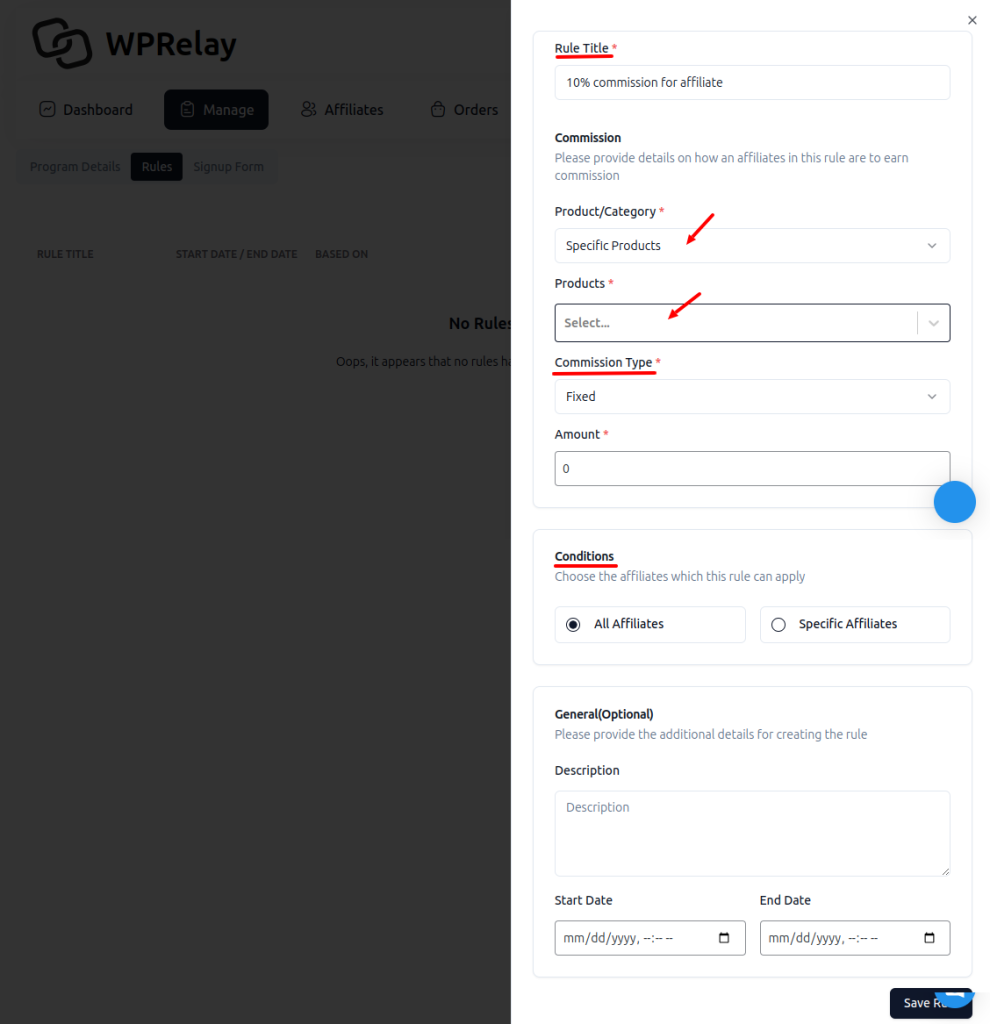
(ii) To set affiliate commissions for specific products,

* Go to manage -> Rules -> Add Rule
* Enter rule title
* Select ‘ Specific Products’ in the product/category section
* Then choose the products you want to give commission for affiliates from the drop-down
* Set ‘Fixed’ or ‘Percentage’ according to your commission plan.
* From the conditions, select ‘ All affiliates’ or ‘specific affiliate’ as per your preference.

<figure><img src="https://wprelay.com/wp-content/uploads/2024/09/Setting-affiliate-program-commission-rates-for-specific-products-1-990x1024.png" alt="Setting affiliate program commission rates for specific products" height="1024" width="990"><figcaption></figcaption></figure>

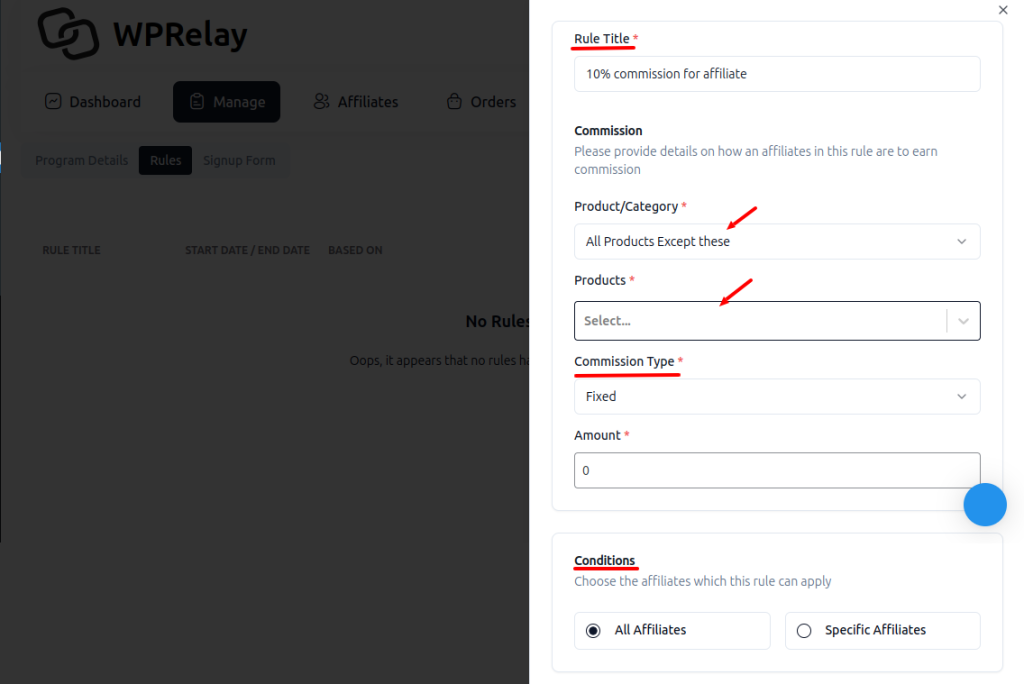
(iii) To set affiliate commission rates for All products except a few,

* Go to manage → Rules
* Enter title
* Select ‘All Products Except These’ in the product/category section
* Then choose the products you don’t want to provide commission for affiliates from the drop-down
* Set ‘Fixed’ or ‘Percentage’ according to your commission plan.
* From the conditions, select ‘ All affiliates’ or ‘specific affiliate’ as per your preference.

<figure><img src="https://wprelay.com/wp-content/uploads/2024/09/Setting-affiliate-marketing-commission-rate-for-all-products-except-a-few-using-WPrelay-1024x684.png" alt="Setting affiliate marketing commission rate for all products except a few using WPrelay" height="684" width="1024"><figcaption></figcaption></figure>

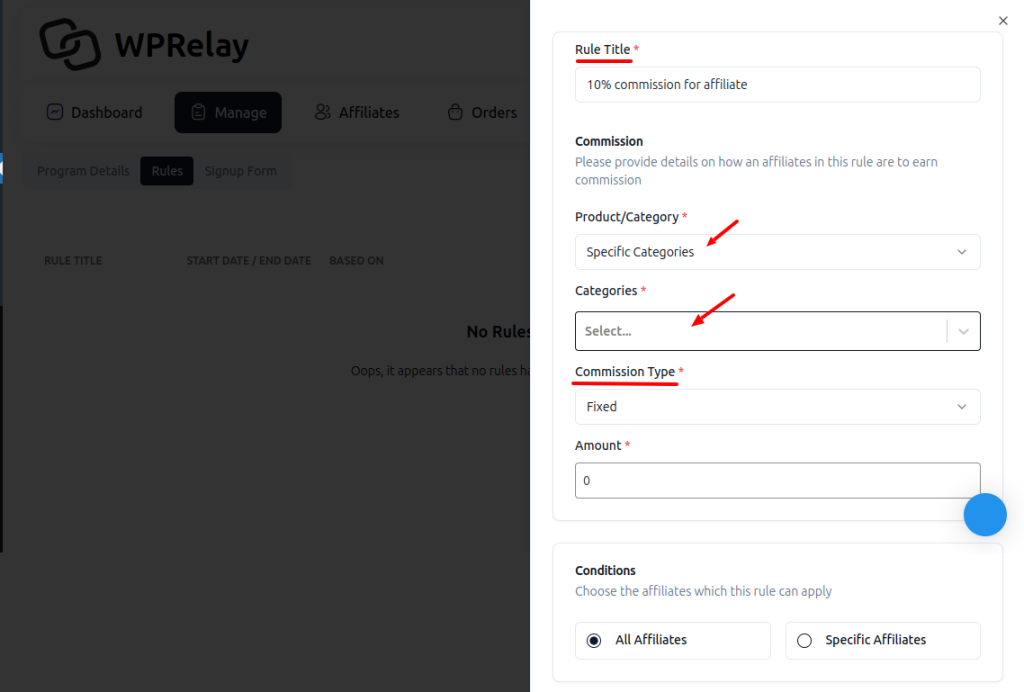
(iv) To set commission rates for Specific categories,

* Go to manage → Rules
* Enter title
* Select ‘Specific Category’ in the product/category section
* Then choose the categories you want to provide commission rates for affiliates from the drop-down
* Set ‘Fixed’ or ‘Percentage’ according to your commission plan.
* From the conditions, select ‘ All affiliates’ or ‘specific affiliate’ as per your preference.

<figure><img src="https://wprelay.com/wp-content/uploads/2024/09/Setting-affiliate-marketing-commission-rate-for-specific-category-using-WPrelay-1024x692.png" alt="Setting affiliate marketing commission rate for specific category using WPrelay" height="692" width="1024"><figcaption></figcaption></figure>

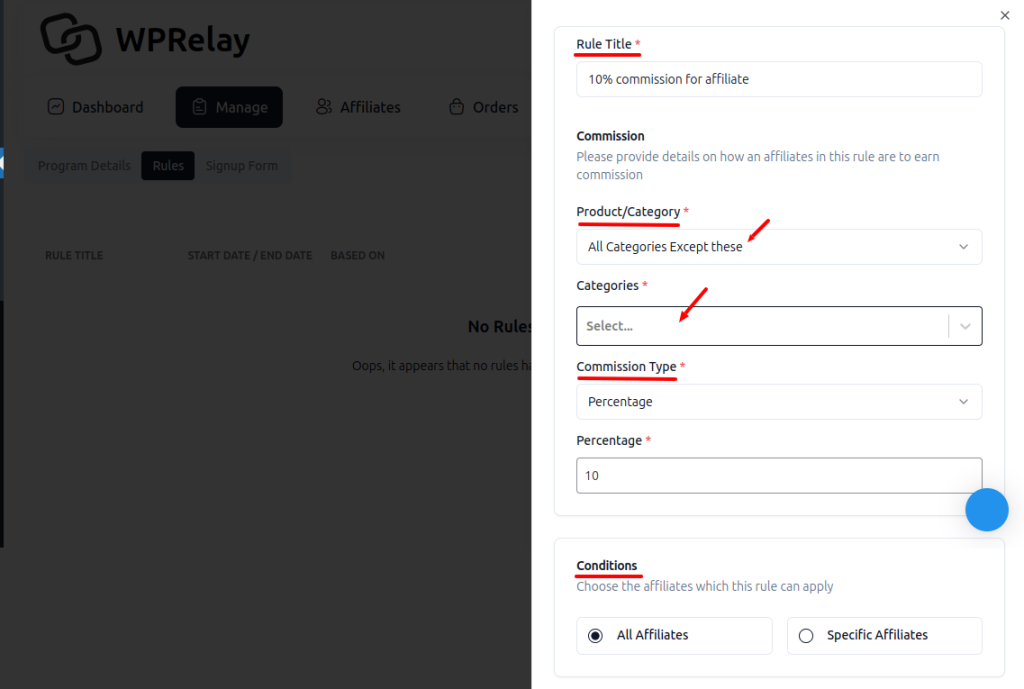
(v) To set commission rates for categories except a few,

* Go to manage → Rules
* Enter title
* Select ‘All Categories Except These’ in the product/category section
* Then choose the categories you don’t want to provide commission for affiliates from the drop-down
* Set the ‘Fixed’ or ‘Percentage’ commission type according to your commission plan.
* From the conditions, select ‘ All affiliates’ or ‘specific affiliate’ as per your preference.

<figure><img src="https://wprelay.com/wp-content/uploads/2024/09/Setting-affiliate-commission-rates-for-all-categories-except-a-few-using-Wprelay-1024x689.png" alt="Setting affiliate commission rates for all categories except a few using Wprelay" height="689" width="1024"><figcaption></figcaption></figure>

**Still Unclear ?**

If you need any assistance, please create a [support request](https://wprelay.com/support/) at our ticket system. We are always happy to assist you :)


# Customer Discount

Learn how to set up and manage various discounts for the customers (Percentage and Fixed Cart & Product discounts) using the WP Relay plugin.

**Customer discount** in affiliate marketing is a promotional offer given to customers who buy a product or service through an affiliate's referral link or discount code. This discount motivates customers to complete their purchase while also rewarding the affiliate by driving conversions.

For example:

A customer receives a 10% discount on their order by using an affiliate’s unique code or link.

\
This strategy boosts customer satisfaction and encourages affiliates to actively promote the products or services.

**WP Relay offers 4 types of customer discount options in affiliate marketing. These discount plans allow you to explore various ways to incentivize customers and create competitive promotions for your WooCommerce affiliate program.**

**i) Percentage Discount:**

* Its a popular promotional strategy in affiliate marketing. They provide customers with a discount that is a specific percentage of the total purchase value. WP Relay simplifies the process of offering these discounts through affiliate links or unique codes.&#x20;

**For** **example**:

* A customer gets 2**5% off** their total purchase when using an affiliate’s code, such as **AFFILIATE15**.&#x20;

<figure><img src="/files/iYaO6rskYik1ROg8BNZG" alt=""><figcaption></figcaption></figure>

Offering percentage discounts through WP Relay enables businesses to attract more customers while strengthening their partnerships with affiliates.

**ii) Fixed Cart Discount:**

* It is another effective promotional strategy in affiliate marketing. They offer customers a specific, flat amount off their total purchase value, regardless of the order size. WP Relay makes it easy to provide these discounts using affiliate links or unique codes.

**For** **example**:

* A customer receives **$10 off** their total purchase when using an affiliate’s code, such as **AFFILIATE25**.

<figure><img src="/files/389EdqwVLDY75bNoc2Ee" alt=""><figcaption></figcaption></figure>

This simple strategy motivates customers to finalize their purchases while enabling affiliates to generate more conversions.

**iii) Fixed Product Discount:**

* It is highly effective promotional tactic in affiliate marketing. They provide customers with a set, flat discount on specific products, making them ideal for promoting individual items. WP Relay simplifies the process of applying these discounts through affiliate links or unique codes.

**For** **example**:

* A customer receives **$10 off** a specific product when using an affiliate’s code, such as **AFFILIATE10**.

<figure><img src="/files/jSXtJiPRgmFnuPzwcLwF" alt=""><figcaption></figcaption></figure>

This focused discount strategy not only encourages customers to purchase promoted products but also helps affiliates increase conversions on targeted items.

**iv) No Discount:**

* It is a straightforward approach in affiliate marketing where customers do not receive any direct price reduction when using an affiliate’s referral link or code. Instead, this method focuses on rewarding affiliates for driving traffic and conversions without incentivizing customers with discounts.

**For** **example**:

* A customer makes a purchase through an affiliate’s referral link or code, such as **AFFILIATE123**, without any discount applied to their order.

<figure><img src="/files/rkkpBMGYXiYwafBxywC4" alt=""><figcaption></figcaption></figure>

This approach simplifies the affiliate program, focusing entirely on compensating affiliates for their efforts while maintaining the full product price for customers. It works well for brands that prioritize protecting margins or maintaining consistent pricing.

**Don't have WPRelay yet? Purchase** [**WPRelay PRO now**](https://wprelay.com/pricing/)**.**

**Still Unclear?**

If you need any assistance, please create a [support request](https://wprelay.com/support/) at our ticket system. We are always happy to assist you :)


# Signup Forms

Learn how to validate the signup forms and manage the affiliates associated with registration for WP Relay.

**Signup forms** are used to onboard new affiliates into the affiliate program. These forms collect essential information from potential affiliates, enabling them to register and start promoting products or services.

<figure><img src="/files/67pRTfSuU9XLzx0NDjYo" alt=""><figcaption></figcaption></figure>

### Setting Up Your WooCommerce Affiliate Registration Form <a href="#h-setting-up-your-woocommerce-affiliate-registration-form" id="h-setting-up-your-woocommerce-affiliate-registration-form"></a>

Setting up an affiliate registration form in WooCommerce can boost your affiliate program’s reach, efficiency, and conversion rates.

With tools like [WPRelay](https://wprelay.com/) and flexible commission options, building a customized, professional WooCommerce affiliate registration form becomes easy.

Here, we have explained the essential steps to configure your WooCommerce affiliate registration form and recruit more affiliates.

#### 1. Use a WooCommerce Affiliate Plugin <a href="#h-1-use-a-woocommerce-affiliate-plugin" id="h-1-use-a-woocommerce-affiliate-plugin"></a>

WPRelay is a WooCommerce plugin for affiliate marketing. It not only helps create the form but also provides tools to [create and manage affiliate programs](https://wprelay.com/blog/woocommerce-affiliate-program/), and affiliates, track progress, and streamline payments. You can carry out the affiliate program best practices for WooCommerce with WPRelay.

<figure><img src="https://wprelay.com/wp-content/uploads/2024/11/image1-1-1024x483.png" alt="WPRelay WooCommerce Affiliate Plugin" height="483" width="1024"><figcaption></figcaption></figure>

#### 2. Create an Affiliate Program with Flexible Commission <a href="#h-2-create-an-affiliate-program-with-flexible-commission" id="h-2-create-an-affiliate-program-with-flexible-commission"></a>

Create an affiliate program and [set flexible commissions](https://wprelay.com/blog/how-to-set-affiliate-commission-rates-for-woocommerce/). You can include the commission details in the WooCommerce affiliate registration form. This will encourage more sign-ups from affiliates looking to benefit from customized commission rates. With WPRelay you can choose from tiered rewards, lifetime commissions, or rule-based commissions. Using WooCommerce referral settings, set clear commission levels that can attract serious affiliates.

<figure><img src="https://wprelay.com/wp-content/uploads/2024/11/image6-1.png" alt="Set Affiliate Commission rate" height="506" width="1008"><figcaption></figcaption></figure>

#### 3. Customize Affiliate Signup Form <a href="#h-3-customize-affiliate-signup-form" id="h-3-customize-affiliate-signup-form"></a>

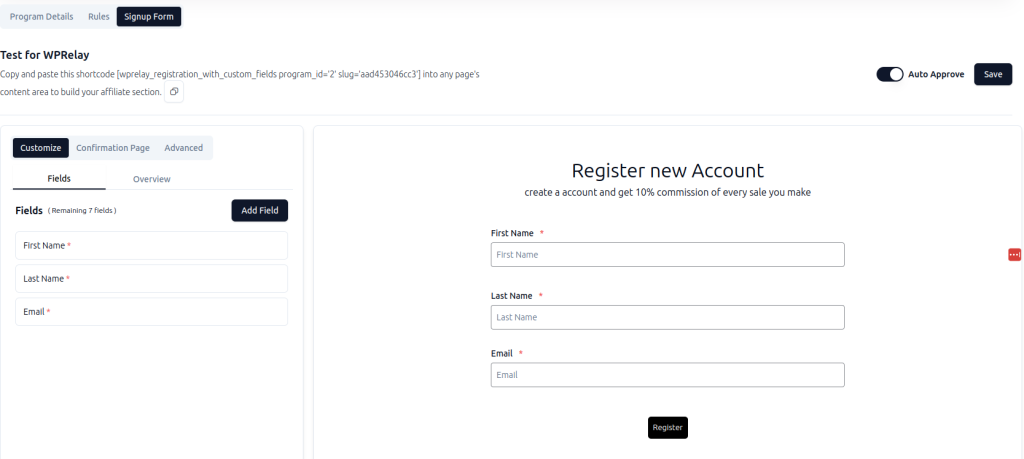
With WPRelay, you can easily create a personalized affiliate signup form for each program. To meet your unique program needs, customize fields to be added to your affiliate program. Adjusting these fields is easy with the form builder plugin in WooCommerce. You can customize fields so you can ensure you’re onboarding affiliates who fit your brand’s goals.

<figure><img src="https://wprelay.com/wp-content/uploads/2024/11/image2-1-1024x459.png" alt="Customize Affiliate Registration Form" height="459" width="1024"><figcaption></figcaption></figure>

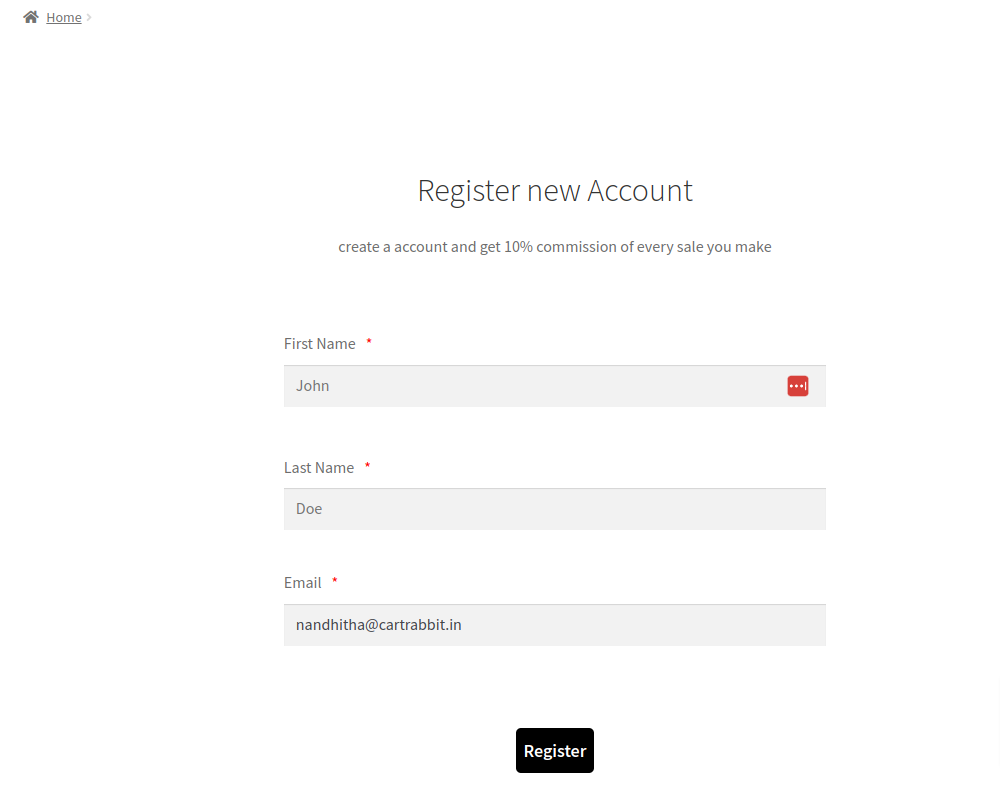
#### 4. Embed the Form in Your WooCommerce Store <a href="#h-4-embed-the-form-in-your-woocommerce-store" id="h-4-embed-the-form-in-your-woocommerce-store"></a>

Embedding the registration form for affiliate WooCommerce directly on your site is essential for easy access. This visibility increases sign-ups as potential affiliates find the form on your landing pages or other high-traffic areas. With a plugin, embedding the form is as easy as copy-pasting the form ID.

<figure><img src="https://wprelay.com/wp-content/uploads/2024/11/image4.png" alt="Registration Form in Store" height="793" width="1000"><figcaption></figcaption></figure>

#### 5. Promote Your Registration Form to Recruit More Affiliates <a href="#h-5-promote-your-registration-form-to-recruit-more-affiliates" id="h-5-promote-your-registration-form-to-recruit-more-affiliates"></a>

Once your WooCommerce affiliate registration form is live, promote it through channels like social media, newsletters, and ads. Regular promotion widens your reach. This will bring more high-quality affiliates to your program. Use targeted marketing tactics, like offering bonuses, to encourage quick sign-ups

Creating an optimized registration form using plugins like WPRelay can greatly add value to your affiliate recruitment efforts.

By implementing flexible commissions, customizing fields, and embedding the WooCommerce affiliate registration form in your store, you’ll create a smooth affiliate user journey with WooCommerce. This can attract serious affiliates. Follow these steps to grow your program and drive more conversions.

**Did you know that we have a convenient Affiliate Signup Form available for you to join an affiliate program?**&#x20;

**Click here to find:** [**Affiliate Signup Form** ](/settings/affiliate-signup-form)

**Still Unclear?**

If you need any assistance, please create a [support request](https://wprelay.com/support/) at our ticket system. We are always happy to assist you :)


# Affiliates

Learn how to validate the affiliate accounts and how to manage their performance and activities in the WP Relay plugin from this guide.

Who are Affiliates?

Affiliates refer to influencers promoting your site or products and earning commissions upon successful sales, creating mutual benefits for affiliates and merchants. <br>

<figure><img src="/files/6tqvHb5WZgGrV1RTmyBN" alt=""><figcaption></figcaption></figure>

Affiliate marketing creates a mutually beneficial relationship between businesses and affiliates, fostering growth while offering flexible and scalable earning opportunities.

Don't have WPRelay yet? Purchase [WPRelay PRO now](https://wprelay.com/pricing/).


# Creating an Affiliate

Learn how to create an affiliate and Explore the different methods by which a user can become an affiliate while using WPRelay from this simple documentation.

**There are two methods for a user to become an affiliate on your site:**

* Affiliate Registration Form
* Manual creation by an admin through the backend

{% hint style="info" %}
Haven't yet purchased the WPRelay PRO ?

[Get WPRelay PRO](https://wprelay.com/pricing/)
{% endhint %}

**Method 1: Affiliate Registration Form**

For details on the Affiliate Registration Form and instructions on how to create this page, [watch this video. ](https://www.youtube.com/watch?v=MYTe_pTHN1M)

Once a user completes the registration form, their application will appear as a pending request in the Affiliate Dashboard. **To approve this request, follow these steps:**

* Go to Wordpress back end -> WPRelay -> Affiliates&#x20;
* Choose Pending tab -> Select the specific Affiliate -> Approve&#x20;

**Screenshot showing the pending requests:**&#x20;

<figure><img src="/files/Cm7RA6MLproZUrZiGRjX" alt=""><figcaption></figcaption></figure>

Upon approval and selection of a specific program by the admin, the user will officially become an affiliate.

Method 2: Creating an Affiliate via Backend as Admin

{% embed url="<https://youtu.be/VbAG8DtZTwI>" %}

**To manually create an affiliate:**

* Go to Wordpress back end -> WPRelay -> Affiliates&#x20;
* Click on "Create Affiliate" button.

<figure><img src="/files/A5sP7KHtWelulVT8RR4B" alt=""><figcaption></figcaption></figure>

**Details of configurations are:**&#x20;

* **Program:** In this section, associate an affiliate with a specific program by typing a few characters of the program title to select it.&#x20;
* **Referral Code:** Here, you have the option to provide a coupon/referral code to the affiliate. You can either auto-generate the code or enter a code of your choice manually.&#x20;
* **Personal Info:** Under this section, you can enter the first name, last name, and email ID of the affiliate.&#x20;
* Finally, click on "Save Affiliate" to complete the process.
* **Approving Affiliates** - Ensure to "Approve" the affiliate from the pending tab, as affiliates are initially set to pending status by default.
* **Managing WooCommerce Accounts** - During the "Approval" process, if the affiliate does not already have a WooCommerce customer account, you'll have the opportunity to create one. Upon creating a WooCommerce account for the affiliate, a password reset email will be sent to them via WooCommerce.

**Screenshot showing Approving the affiliate:**&#x20;

<figure><img src="/files/ZxqPHaCp86S6tiPD3WKY" alt=""><figcaption></figcaption></figure>

Both methods involve a straightforward approval process, detailed in the respective sections of your admin panel.&#x20;

**NOTE:**

* If affiliates register through the Affiliate Registration Form, they will appear in the "Pending" status under the Affiliates Tab. When approving these affiliates, you will also have the option to assign a Program to them.&#x20;
* Additionally, you can change the Program associated with an affiliate at any time from the Affiliates tab.

Do more with PRO. [Get WPRelay PRO](https://wprelay.com/pricing/).&#x20;

**Next Steps:**

**You may also want to check out these helpful guides:**

* [Refer to this guide for information on offering a Simple Affiliate Program.](https://docs.wprelay.com/program-types/creating-simple-affiliate-program/affiliate-a-earns-10-commission-per-sale-while-customer-gets-10-discount.)
* [Explore this document for details on the available affiliate settings.](https://docs.wprelay.com/settings/affiliate-settings)
* [Review this document to learn more about Email Notification for Affiliates.](https://docs.wprelay.com/settings/email-notification-for-affiliates-and-their-settings)

**Still Unclear ?**

If you need any assistance, please create a [support request](https://wprelay.com/support/) at our ticket system. We are always happy to assist you :)


# Sales

The Orders tab offers a concise summary of all processed orders, providing essential details such as order ID, customer information, total amount and status for management.

{% embed url="<https://youtu.be/hIaD7eJyN4w>" %}

{% hint style="info" %}
Haven't yet purchased the WPRelay PRO?

[Get WPRelay PRO](https://wprelay.com/pricing/)
{% endhint %}

**Introduction:**

The Orders tab within affiliate marketing dashboards serves as a valuable tool for tracking orders placed through referral links or coupon codes.

**What is affiliate order tracking?**

Affiliate order tracking allows merchants (people who sell products) to see how many sales they’ve made through their affiliate marketing programs. When a customer clicks on the affiliate link and makes a purchase on the merchant’s website, the sale is credited to the affiliate.

**How can merchants use the orders tab to track the orders?**

In the WPRelay plugin, the Orders tab typically provides merchants with a list of orders generated by new customers via affiliate links. This feature is beneficial for merchants to monitor and review orders placed through affiliate links.

Here’s some general information on what merchants might see in an Orders tab:

* **ORDER**: This section provides the Order ID for reference.&#x20;
* **CUSTOMER**: Here, you'll find details about the customer, indicating their name.&#x20;
* **AFFILIATE**: This section displays the name of the Affiliate associated with the order.&#x20;
* **TOTAL**: This section indicates the current total amount of the order.&#x20;
* **STATUS**: This section displays the current status of the order, such as “pending,” “processing,” or “completed.”

Here's the screenshot of the orders tab:

<figure><img src="/files/hxQdBOaqILRtFLVQLJlm" alt=""><figcaption></figcaption></figure>

**Benefits of using the orders tab for affiliates**

* **Enhanced Transparency:** See all affiliate-generated orders clearly.&#x20;
* **Strategic Decision-Making:** Use order data to make informed decisions about your program. Identify best-converting products/services, target specific demographics, and refine marketing efforts.
* **Improved Affiliate Relationships:** Strengthen relationships with affiliates through transparent order tracking. Address discrepancies promptly to build trust and motivation.

Overall, the orders tab can be a valuable tool for affiliates to track their performance and see how much commission they have earned. However, it’s important to be aware of the limitations of the orders tab and to double-check your earnings with the merchant.

**Now, let's see about the sales tab which is seen under the affiliates tab:**

**Sales:**

This section likely displays a list of all sales generated through affiliate referrals.

* **Order ID:** A unique code that tracks and manages each order from affiliate referrals.
* **Affiliate Name**: Identifies the affiliate who referred the customer and contributed to the sale.
* **Sale Amount**: Shows the total value of the sale made through the affiliate's referral.
* **Date**: Indicates the date when the sale occurred.
* **Status**: Displays the current status of the sale, such as "pending," "completed," or "refunded."
* **Program Name:** The title or identifier of the affiliate program, used to distinguish it from other programs.

<figure><img src="/files/zl9fmgVY7C97dvTmDFYL" alt=""><figcaption></figcaption></figure>

Do more with PRO. [Get WPRelay PRO](https://wprelay.com/pricing/).&#x20;

**Next Steps:**

**You may also want to check out these helpful guides:**

* [Explore this guide to learn about how to create simple program](https://docs.wprelay.com/program-types/creating-simple-affiliate-program).
* <https://docs.wprelay.com/manage-affiliates/commissions-and-payouts>
* <https://docs.wprelay.com/manage-affiliates/wprelay-multi-currency>

**Still Unclear?**

If you need any assistance, please create a [support request](https://wprelay.com/support/) at our ticket system. We are always happy to assist you :)

<br>


# Commissions

**What is affiliate commission tracking?**

Affiliate commission tracking allows merchants (people who sell products) to see how much commission they owe to their affiliates. When a customer clicks on the affiliate link and makes a purchase on the merchant’s website, the sale is credited to the affiliate and the merchant owes the affiliate a commission.

**How can merchants use the commissions tab to track affiliate commissions?**

The Commissions tab in an affiliate marketing plugin typically allows merchants to see a list of all the commissions that they owe to their affiliates. This information can be helpful for merchants to track their affiliate marketing spending and see which affiliates are generating the most sales.

**Here’s some general information on what merchants might see in a Commissions tab:**

* ORDER ID: This section provides the Order ID for reference.
* AFFILIATE: This section displays the name of the Affiliate associated with the order.
* TOTAL/COMMISSION: This section indicates the current total amount of the order and commission for the affiliate.
* STATUS: This section displays the current status of the order, such as “pending,” “approved”

**Here's the screenshot of the commission tab:**                           &#x20;

<figure><img src="https://lh7-rt.googleusercontent.com/docsz/AD_4nXf3Nsl6cpnfSpKprL4nMl9OcoJDp5lfTGrr2Q2uwrd6_nue520IeLw3CYYk8ODpz83prFrOp9O5awwf2HWVK9DtS1mSGDz1gLxoG34CRTo2Yho3ljzopKpH083titsAzna86nlh4g?key=bAetDrc0hFbijHTlmjQaL3si" alt=""><figcaption></figcaption></figure>

**Benefits of using the commissions tab for merchants**

* Track affiliate marketing spending: The commissions tab allows merchants to see how much they are spending on affiliate marketing commissions. This information can be helpful for merchants to track their return on investment (ROI) for their affiliate marketing programs.
* Identify top-performing affiliates: The commissions tab can help merchants identify their top-performing affiliates. This information can be helpful for merchants to develop stronger relationships with these affiliates and potentially offer them higher commission rates or other incentives.

Overall, the commissions tab can be a valuable tool for merchants to track their affiliate marketing commissions and manage their affiliate relationships.

**Now, let's see about the commission tab which is seen under the affiliates tab:**

**Commissions:**

This section likely displays a list of all affiliate transactions (sales or leads generated by affiliates).

* Affiliate Name: Identifies the affiliate who earned the commission.
* Amount: Shows the commission amount earned by the affiliate for a specific transaction.
* Date: Indicates the date the commission was earned.
* Status: This section displays the current status of the order, such as “pending,” “approved” or "rejected"

**Here's the screenshot of the commissions tab:**

<figure><img src="https://lh7-rt.googleusercontent.com/docsz/AD_4nXfTDyxUzv2_GujcsPs_00wQgh9Lzddxa4a07qBU95frShkadKAVGNVeoGISk4e26tm-MXRe7_DU7FXBroWqnGAVRs8Nwwq6NyYRbx6P4Vp-BohplCKgr7MPtF4tlPn87NCuuNpT?key=bAetDrc0hFbijHTlmjQaL3si" alt=""><figcaption></figcaption></figure>

\
**Still Unclear?**

If you need any assistance, please create a [support request](https://wprelay.com/support/) at our ticket system. We are always happy to assist you :)<br>


# Payouts

**What is a payout?**

In affiliate marketing, a payout refers to the commission that a merchant pays to an affiliate for referring a customer or sale. When a customer clicks on the affiliate’s unique tracking link and completes a purchase on the merchant’s website, the sale is credited to the affiliate. The merchant then owes the affiliate a commission, which is typically a percentage of the sale amount.

**How affiliate payouts work**

The specific process for affiliate payouts can vary depending on the affiliate marketing program, but here’s a general overview:

1. Affiliate joins a program: They discover a merchant's affiliate program and sign up to take part. Then, they get a special link to share and promote the merchant's products or services.
2. Affiliate promotes the merchant’s products: The affiliate advertises the merchant's offerings on their website, social media, or other marketing materials, using their unique link.
3. Customer makes a purchase: If the customer buys something from the merchant's website using the Affiliates link within that time, the affiliate gets credit for the sale.
4. Merchant tracks sales and commissions: The merchant monitors sales and commissions using their affiliate marketing software, seeing which affiliates referred which customers and how much they should pay each affiliate.
5. Merchant pays out commissions to affiliates: Following the payout schedule in the affiliate agreement, the merchant sends payments to affiliates. This usually happens monthly but can differ depending on the program.

<figure><img src="https://lh7-rt.googleusercontent.com/docsz/AD_4nXdPe41SN7ysKLc3U6nhVU7AURevrv7VUSSDgmZllaSUgXr4e2NSZBGrbO_cm5XBcLbvC8H6x_sub7uTErxgjScDB8fQu1vDfkADdDLjdDc8hdP_ojKp0N-1M7cBOalcBk91F9790g?key=bAetDrc0hFbijHTlmjQaL3si" alt=""><figcaption></figcaption></figure>

<br>

The specific payout method that is used will depend on the affiliate program and the preferences of the affiliate and the merchant.

**Now, let's see about the payout tab which is seen under the affiliates tab**:

* Date: This column likely shows the date the payout was initiated or recorded.
* Amount: This column likely shows the payout amount sent to the affiliate.
* Status: This column might show the status of the payout, such as "Success" (if the payout was successful), "Pending" (if the payout is awaiting approval or processing), or "Failed" (if there was an error during payout).
* Revert?: This column allows the admin to reverse or cancel a payout if needed.
* Revert Reason: This column allow the admin to specify a reason for reversing a payout.
* Payment Type: This column might show the payment method used for the payout (e.g., PayPal, bank transfer).
* Admin Note: This column allow the admin to add internal notes about the payout.
* Affiliate Note: This column is for affiliates to add notes for the admin regarding the payout.

**Here's the screenshot showing the payout tab under affiliates tab:**

<figure><img src="https://lh7-rt.googleusercontent.com/docsz/AD_4nXdoJ0NSLCZxr3Sok4hHX1ifCd0ri_jxQKWa3EzuSPcSl8rQ5nLcP9bZLhg99_Wrz5JM0uBxED-Pe1O1bToxbt_uevYHP3Efa5bD7mYr2LyvadAOVSUYhbf4Bg23gpB7cwh3ZhQW?key=bAetDrc0hFbijHTlmjQaL3si" alt=""><figcaption></figcaption></figure>

**Do more with PRO.**[ **Get WPRelay PRO**](https://wprelay.com/pricing/)**.**

**Next Steps:**

**You may also want to check out these helpful guides:**

* ​[Explore this guide to learn about general settings.](https://docs.wprelay.com/settings/general-settings)​
* ​[For more information about creating an affiliate registration form, please refer to this document.](https://docs.wprelay.com/manage-affiliates/creating-an-affiliate-registration-form)​
* ​[For details on the Becoming an affiliate, please consult this resource.](https://docs.wprelay.com/manage-affiliates/becoming-an-affiliate)​

**Still Unclear?**

If you need any assistance, please create a[ support request](https://wprelay.com/support/) at our ticket system. We are always happy to assist you :)

<br>


# General Settings

Explore and discover all the different display settings available on the General settings page for the WP Relay plugin.

**Introduction:**&#x20;

The general settings option in an affiliate plugin serves as the control centre for managing various essential configurations. Here, users can set up fundamental parameters such as cookie duration, commission setting, contact information and other core functionalities. It provides a centralized platform for tailoring the affiliate program to meet specific business needs and objectives efficiently.

Settings options available are,

* #### Cookie Duration
* #### Commission Settings
* #### Contact Information
* #### Customize the Theme As you want

{% hint style="info" %}
Haven't yet purchased the WPRelay PRO?

[Buy WPRelay PRO](https://wprelay.com/pricing/)
{% endhint %}

### Cookie Duration

The cookie duration in the WPRelay plugin dictates how long the affiliate link's associated cookie remains active in the user's browser.&#x20;

For instance, if a customer clicks on your shared affiliate link, the cookie initiates and tracks the link's status for potential orders for a period of 90 days.

Here's how it works: If a customer clicks your affiliate link and adds items to the cart but doesn't complete the purchase, the cookie continues to monitor the link's status. If an order is placed, the cookie clears from the browser. However, if no order is made within the 90-day period, the cookie persists, continuously checking the link's status until it automatically expires after the default 90-day duration.

Here is the settings page where you can find the Cookie Duration option:

<figure><img src="/files/Co3k20nR1cGOuxQABiNm" alt=""><figcaption></figcaption></figure>

{% hint style="warning" %}
Please note that by default, the cookie duration is set to 90 days. However, you have the flexibility to adjust the expiration of the affiliate tracking cookie according to your preferences.
{% endhint %}

### Commission Settings

Commission Settings allow you to control how charges associated with shipping and taxes are factored into the calculation of commissions.

Here are the options in the commission settings:

<figure><img src="/files/ywDmcjOqIB5HHpaEoVnW" alt=""><figcaption></figcaption></figure>

**Exclude Shipping:** This feature ensures that shipping costs are not factored into commission calculations.

**Exclude Taxes:** This option ensures that tax costs are not considered when calculating commissions.

### Contact Information

This contact information like email address and Merchant name will serve as the primary point of contact for AffiliateGo and its affiliates to reach out to you regarding any inquiries, updates, or collaborations related to our affiliate program.

Here is the screenshot indicating the Contact information:

<figure><img src="/files/b7BJP7axN3mrEOk78e7a" alt=""><figcaption></figcaption></figure>

### Customize theme as you want:

This feature allows you to modify both the text colour and the background colour within the WPRelay dashboard.&#x20;

Here is a screenshot of the settings page highlighting the customization options.

<figure><img src="/files/tk6tFOMfbhuroCweJk6v" alt=""><figcaption></figcaption></figure>

Here is a screenshot of the WPRelay dashboard displaying the customization change:

<figure><img src="/files/FfRC94SHlSWd5wQAYtVB" alt=""><figcaption></figcaption></figure>

{% hint style="info" %}
Haven't yet purchased the WPRelay PRO?

[Buy WPRelay PRO](https://wprelay.com/pricing/)
{% endhint %}

**Next Steps:**

**You may also want to check out these helpful guides:**

* [For more information about the Affiliate Registration Page, please refer to this document.](https://docs.wprelay.com/manage-affiliates/creating-an-affiliate-registration-form)
* [Explore this guide to learn about various methods to become an affiliate.](https://docs.wprelay.com/manage-affiliates/becoming-an-affiliate)
* [For details on the emails provided through WPRelay, please consult this resource.](https://docs.wprelay.com/settings/email-notification-for-affiliates-and-their-settings)

{% hint style="warning" %}
Still unclear?

If you need any assistance, please create a [support request](https://www.flycart.org/support) in our ticket system. We are always happy to assist you :)
{% endhint %}


# Affiliate Settings

Learn and explore all the various settings and functionalities of the Affiliate settings page of the WP Relay plugin.

### Introduction

The affiliate setting page allows you to customize and manage various aspects of your affiliate program. Here, you can set commission rates, approve commissions, configure tracking parameters, and view performance metrics. It serves as the control centre for administering your affiliate program effectively, ensuring smooth operation and optimizing performance

Here are the available settings:

* General
* Google Recaptcha V3
* Commission
* Customize Order Status
* Affiliate URL Options

{% hint style="info" %}
Haven't yet purchased the WPRelay PRO?

[Buy WPRelay PRO](https://wprelay.com/pricing/)
{% endhint %}

### General:

This setting allows you to manage shipping and tax charges when calculating commissions.

Here is the screenshot of the general setting on the settings page:&#x20;

<figure><img src="/files/OIRJ6RIt98ZOpO4Vvg0k" alt=""><figcaption></figcaption></figure>

With this option "Allow Affiliate Registration" you can create a new page for the customer where they can fill in the details and join an affiliate.

#### To create a new page you need to follow these steps:

Steps to configure the new page for Affiliate Registration:

Step 1: Copy the shortcode from the setting page.

Step 2: Then go to the WooCommerce Dashboard -> Pages -> Add new pages -> and give the title to the page and paste the shortcode in the shortcode block.

Step 3: Save the page and publish it.

Step 4: Now redirect to the WPRelay Setting page and choose the created page in the Registration page.

#### Here are the screenshots of the configurations:

<figure><img src="/files/AeXmJ3jubiPtMuw5oZh4" alt=""><figcaption></figcaption></figure>

Choose the created page URL in the settings page, here is the screenshot for your reference:

<figure><img src="/files/Kczcx9c7rllzHgER5Ujr" alt=""><figcaption></figcaption></figure>

Now save this setting and let see how this page is visible on the front end:

<figure><img src="/files/FByAKNkSb1VrBuatkG7d" alt=""><figcaption></figcaption></figure>

### Google Recaptcha V3

RECAPTCHA, a complimentary service, safeguards your website against spam and misuse.

Here is the screenshot indicating the setting:

<figure><img src="/files/CgEPB3EghrqS0AdcTFBy" alt=""><figcaption></figcaption></figure>

#### Here are the steps to configure the Google Recaptcha V3:

Step 1: Go to the browser and search Google Recaptcha -> V3 Admin Console -> and to register your site enter the details like label, domain and so on.

<figure><img src="/files/tmNIIAJswOkhSCUwsDoJ" alt=""><figcaption></figcaption></figure>

<figure><img src="/files/ZBusisn27ju22VkJT0oE" alt=""><figcaption></figcaption></figure>

Step 2: Now agree to the condition and click on submit.

Step 3: After clicking the submit button you can able to see the Site Key and the Secret Key in the Google Recaptcha form

Step 4: Copy the keys and paste them on your site.

Step 5: Save the settings.

Here is the screenshot for your reference:&#x20;

<figure><img src="/files/Vew3xPQDgU3UbFk0W9GU" alt=""><figcaption></figcaption></figure>

<figure><img src="/files/aFZbCzasLFgCN7X79U88" alt=""><figcaption></figcaption></figure>

Now you have successfully configured the Google Recaptcha V3

{% hint style="warning" %}
Note: You can only able to see the registration form page only after configuring the Google Recaptcha V3
{% endhint %}

### Commission:

Automate the approval process for affiliate commissions.

This involves setting up a system or process wherein affiliate commissions are approved automatically without manual intervention.

#### Here is the screenshot indicating the settings:

<figure><img src="/files/X4ngPHg9SHsZ6oxIuNND" alt=""><figcaption></figcaption></figure>

The purpose of auto-approved commissions in affiliate marketing is to streamline the payment process for affiliates.&#x20;

When an affiliate generates a sale or leads through their referral link, the commission is automatically approved without the need for manual review by the merchant or affiliate program manager. This helps ensure timely payment to affiliates and reduces administrative overhead.

In auto-approved commissions you have two options they are Immediate and Delayed

* **Immediate approval**
* **Delayed approval**

#### **Immediate approval**

**"Immediate approval"** means that commissions are approved instantly upon a successful sale or lead. This provides immediate gratification to affiliates as they see their earnings reflected right away.&#x20;

{% hint style="warning" %}
Please note that immediate approval may still require a minute to process commission approvals due to the cron execution.
{% endhint %}

#### Here is the screenshot indicating the Immediate auto-approval commission:&#x20;

<figure><img src="/files/6e7K0YV1ImKo1fIEG5pw" alt=""><figcaption></figcaption></figure>

#### Delayed approval

Delayed approval involves a waiting period before commissions are approved. This waiting period allows the merchant or affiliate program manager to verify the legitimacy of the sale or lead before approving the commission. Delayed approval might be implemented to prevent fraudulent transactions or ensure that the sale meets certain criteria set by the merchant.

#### Here is the screenshot indicating the Delayed auto-approval commission auto-approval

<figure><img src="/files/X4tYrD6z27VKuucqaLrH" alt=""><figcaption></figcaption></figure>

You can set the number of days after "After N no of days" to approve the commission.

### Customize Order Status

It suggests that users can modify the status of orders so that customers will either be eligible to receive a commission once their order is successfully completed, or the commission will be denied if the order fails for any reason. This customization empowers users to tailor the commission process based on the outcome of orders.

#### Here is the screenshot referring to the settings:

<figure><img src="/files/NWmmP5TxQIXZ0BzjEM8Y" alt=""><figcaption></figcaption></figure>

In the Customize Order Status, you have two options they are Successful Order Status and Failed Order Status.

#### Successful Order Status:

A "Successful Order Status" is important because it determines when affiliates are eligible to receive commissions for their referrals. When an order reaches this status, it triggers the commission process, allowing affiliates to earn their commissions for the sale or referral they facilitated.

You can choose the Order Status to be included in the Successful Order Status

#### Failed Order Status:

The Failed Order Status feature allows the affiliate plugin to track and manage orders that have failed, providing clarity to both affiliates and merchants about which transactions did not result in a successful sale. This information is valuable for affiliates as they may not receive commissions for orders that are marked as failed. Additionally, it helps merchants identify and address any issues that may be causing order failures to improve overall transaction success rates.

Also, you can choose the Order Status to be included in the Failed Order Status too.

### Affiliate URL Option:

The "affiliate URL" option in an affiliate plugin refers to a feature that allows affiliates to generate unique referral permalinks that track their promotional efforts. When an affiliate promotes a product or service, they use their affiliate URL, which contains a unique identifier or code assigned to them by the affiliate program. When a customer clicks on this affiliate URL and makes a purchase or performs a desired action, the affiliate is credited with the referral and earns a commission.

You can also change the Affiliate variable URL by this option:

Here is the screenshot indicating the settings:

<figure><img src="/files/dQzAsl46R5VqyW1b0Hhg" alt=""><figcaption></figcaption></figure>

By changing this URL variable you can able to it see the changes in the permalink of the affiliate link

Here is the screenshot indicating the URL changes:

<figure><img src="/files/nVNFlJuefnkXUGtJVlIl" alt=""><figcaption></figcaption></figure>

Affiliate links help companies track sales from specific affiliates. When I share one with a customer, it has a special code identifying me. When the customer clicks and buys something, the company knows it's from me and pays me a commission. It's a way for companies to reward people for promoting their stuff.

{% hint style="info" %}
Haven't yet purchased the WPRelay PRO?

[Buy WPRelay PRO](https://wprelay.com/pricing/)
{% endhint %}

**Next Steps:**

**You may also want to check out these helpful guides:**

* [For more information about the Affiliate Registration Page, please refer to this document.](https://docs.wprelay.com/manage-affiliates/creating-an-affiliate-registration-form)
* [Explore this guide to learn about various methods to become an affiliate.](https://docs.wprelay.com/manage-affiliates/becoming-an-affiliate)
* [For details on the emails provided through WPRelay, please consult this resource.](https://docs.wprelay.com/settings/email-notification-for-affiliates-and-their-settings)

{% hint style="warning" %}
Still unclear?

If you need any assistance, please create a [support request](https://www.flycart.org/support) in our ticket system. We are always happy to assist you :)
{% endhint %}


# Affiliate signup Form

Learn how to create an Affiliate registration/Signup form using the WP Relay plugin from this simple guide.

**Introduction:**

Affiliates refer to influencers promoting your site or products and earning commissions upon successful sales, creating mutual benefits for affiliates and site owners.

An affiliate registration form is a crucial tool for businesses looking to expand their reach through partnerships with affiliates. This form serves as the gateway for potential affiliates to sign up and join your affiliate program.

This guide outlines the step-by-step process of creating an affiliate registration form, simplifying the setup so you can quickly start recruiting affiliates and growing your business through collaborative efforts.

{% hint style="info" %}
Haven't yet purchased the WPRelay PRO ?

[Get WP Relay PRO](https://wprelay.com/pricing/)
{% endhint %}

{% embed url="<https://youtu.be/MYTe_pTHN1M>" %}

**Initiating Form Creation:**&#x20;

To create an affiliate registration form, you'll need to generate a dedicated page. This can be achieved by utilizing the shortcode provided within our Affiliates settings tab. To do that, follow these steps:

Please go to WordPress dashboard -> WPRelay -> Settings -> Affiliate settings

On this page, locate the shortcode provided for generating the affiliate registration form.

Settings page - screenshot:

<figure><img src="/files/mP5J0PLV7tWcVPdqC2kG" alt=""><figcaption></figcaption></figure>

Create a new page on your WordPress site and insert the shortcode into the page content.

Created page screenshot:

<figure><img src="/files/wV83oJ3cbXxwhyyI4hqn" alt=""><figcaption></figcaption></figure>

After creating Affiliate page, select the created page in the settings tab.

Screenshot:&#x20;

<figure><img src="/files/u74Eryj8Xd8YiP8BdXPw" alt=""><figcaption></figcaption></figure>

After creating the page with the shortcode, integrate Google reCAPTCHA V3 within the settings tab to enhance security.

**Integrating Google reCAPTCHA v3:**

Google reCAPTCHA V3 is a robust security feature safeguarding websites from spam and abuse. It evaluates user behavior, assigning a score to determine the likelihood of human interaction. Here's how to set it up:

1. Go to the website <https://www.google.com/recaptcha/admin/create>.
2. Enter a label for your reCAPTCHA. This label will be displayed to users next to the reCAPTCHA badge.
3. Enter your domain name in the **Domains** field. You can add multiple domains separated by commas.
4. Click the **Submit** button.

Screenshot:

<figure><img src="/files/G3tnvdQ8dvdbUFYVPiEg" alt=""><figcaption></figcaption></figure>

After submitting the form, you will be given a **Site key** and a **Secret key** like this:

<figure><img src="/files/MPfvrvCULIoPKjn9UK2A" alt=""><figcaption></figcaption></figure>

After getting the key, add recaptcha in our WPRelay plugin, to do that follow the below steps,

Go to Wordpress -> WPRelay -> Settings -> Affiliate settings -> Google Recaptcha V3

Paste your **Site key** into the **Site key** field and **Secret key** into the **Secret key** field and Click the **Save Changes** button.

Here's the screenshot for reference:&#x20;

<figure><img src="/files/Eh3Ya045zjLwnD9ynsNa" alt=""><figcaption></figcaption></figure>

**Benefits of Using Google reCAPTCHA v3**

* Protects your website from spam and abuse
* Improves the user experience by not requiring users to solve a CAPTCHA challenge
* Easy to set up and use

**Commission:**

Commission (Auto Approve Affiliate Commission) refers to the system in which affiliate commissions are automatically approved and processed without manual review or intervention. This setting streamlines the commission approval process, ensuring affiliates receive their earnings promptly and efficiently.

You can enable this option if you want to auto-approve the affiliate commission.

Screenshot displaying Commission (Auto Approve Affiliate Commission) setting:

<figure><img src="/files/0TL86GSRxp7RBNNFp96C" alt=""><figcaption></figcaption></figure>

**Customize Order Status**

* Customize your business operations by adding or removing successful or failed order statuses as needed.

<figure><img src="/files/D3GldLUSYBa8GzonnnuK" alt=""><figcaption></figcaption></figure>

**Affiliate URL Options**

* This section lets you set how affiliate URLs are displayed.
* You can choose to include the affiliate's ID or username in the URL.

<figure><img src="/files/533podhrirecvkOvAWXR" alt=""><figcaption></figcaption></figure>

Upon completion of the aforementioned settings, the affiliate page will appear as follows:

<figure><img src="/files/OQQMxUrgPsU14J9FdguQ" alt=""><figcaption></figcaption></figure>

**Did you know that we have a convenient Program Signup Form available for you to register for your desired program? And the best part is, you can even customize the fields to perfectly fit your needs.**

**Click here to find out:** [**Program Signup form**](/manage-affiliate-marketing/program/signup-forms)&#x20;

**Next Steps:**

**You may also want to check out these helpful guides:**

* [For more information about creating Advanced Affiliate program, please refer to this document](https://docs.wprelay.com/program-types/creating-advanced-affiliate-program).
* [Explore this guide to learn about various methods to become an affiliate.](https://docs.wprelay.com/manage-affiliates/becoming-an-affiliate)
* [To know more about Affiliate settings, refer to this document.](https://docs.wprelay.com/settings/affiliate-settings)

**Still Unclear?**

If you need any assistance, please create a [support request](https://wprelay.com/support/) at our ticket system. We are always happy to assist you :)<br>


# Payment methods

Learn how to configure various Payment Methods for the affiliates in the Setting page of the WP Relay plugin

We know that managing payouts can be challenging, so we've integrated the below mentioned payment methods to simplify the process for you.

<figure><img src="/files/YWd75BQRMxyKInuNtyUY" alt=""><figcaption></figcaption></figure>

Do more with PRO.[ Get WPRelay PRO](https://wprelay.com/pricing/).&#x20;

Next Steps:

You may also want to check out these helpful guides:

* <https://docs.wprelay.com/manage-affiliates/commissions-and-payouts>
* [Consult this guide to learn more about becoming an affiliate.](https://docs.wprelay.com/manage-affiliates/becoming-an-affiliate)

Still Unclear ?

If you need any assistance, please create a[ support request](https://wprelay.com/support/) at our ticket system. We are always happy to assist you :)

<br>


# PayPal Rest API

This guide details on how to configure the PayPal API using the WP Relay plugin in the Settings page.

Before you begin integrating your PayPal account with WPrealy, make sure to satisfy these two condition

1. Use a [PayPal Business Account](https://www.paypal.com/bizsignup/#/checkAccount)
2. Enable the Payout option in your business account to be able to send payment

#### Step 1: Enable Payout <a href="#step-1-enable-payout" id="step-1-enable-payout"></a>

1. Go to 'My Account'

<figure><img src="/files/nDIzuBxaW1R0F4WLl6P4" alt=""><figcaption></figcaption></figure>

2. Under Permission -> Payouts -> Click Enable

<figure><img src="https://docs.afflr.io/~gitbook/image?url=https%3A%2F%2Flh7-us.googleusercontent.com%2FLenA_5X1jd_AgTMqfmOxqgv-J1NvuFI6HqllL0gpbQIJ2cUs2K7PxVn2C2iiI8p4P3dMtb4ptvmDWMRr9ER-3RLg3rKVIoWgtd-L2xTBPOUpzFdLlNkSQBPckM3wvlih7lXV29pC0pjUARWhJs0c1nk&#x26;width=768&#x26;dpr=4&#x26;quality=100&#x26;sign=9a9d4192&#x26;sv=2" alt=""><figcaption><p>Enable payout</p></figcaption></figure>

Before enabling your account to send payouts, you ought to confirm a few details with PayPal. You can contact their team to enable the feature.

<figure><img src="https://docs.afflr.io/~gitbook/image?url=https%3A%2F%2Flh7-us.googleusercontent.com%2FY_zIu90q6vmhyjZeFiVqXgNZZzAbjCxf6bYRZbMtSbdbbuWJCZuSnSdUq1e3_W8YttpsyKZlGrAN5rTfNEzqEERJEVKD0t_nadFqKVZi90HYJv4neTiPu_tukWZx5W5z3o9sr5ZUjNB6AvoFXkNX62w&#x26;width=768&#x26;dpr=4&#x26;quality=100&#x26;sign=2a3a0fa1&#x26;sv=2" alt=""><figcaption><p>Request acess</p></figcaption></figure>

#### Step 2: Integrate PayPal with WPRelay <a href="#step-2-integrate-paypal-with-afflr" id="step-2-integrate-paypal-with-afflr"></a>

1. In the Create App dialog box, give a name, select merchant and respective sandbox ID
2. Click Create App

<figure><img src="https://docs.afflr.io/~gitbook/image?url=https%3A%2F%2F1200751259-files.gitbook.io%2F%7E%2Ffiles%2Fv0%2Fb%2Fgitbook-x-prod.appspot.com%2Fo%2Fspaces%252F4IvcT7tXOmKAPrjmBCkP%252Fuploads%252FqZeuRVPbq8oQhFKi0GoT%252FPayPal%2520Create%2520App.png%3Falt%3Dmedia%26token%3D8c909443-b982-402c-9cd3-63ae8e012ea6&#x26;width=768&#x26;dpr=4&#x26;quality=100&#x26;sign=37ba70ed&#x26;sv=2" alt=""><figcaption><p>Create app</p></figcaption></figure>

3. Click Create App

<figure><img src="https://docs.afflr.io/~gitbook/image?url=https%3A%2F%2F1200751259-files.gitbook.io%2F%7E%2Ffiles%2Fv0%2Fb%2Fgitbook-x-prod.appspot.com%2Fo%2Fspaces%252F4IvcT7tXOmKAPrjmBCkP%252Fuploads%252FsUoHlL7RNoXdB6H3CtvM%252FPayPal%2520Apps%2520and%2520Credentials.png%3Falt%3Dmedia%26token%3D84df9f00-f99f-4800-8f46-742ccb2f9d77&#x26;width=768&#x26;dpr=4&#x26;quality=100&#x26;sign=b7afcfdf&#x26;sv=2" alt=""><figcaption><p>PayPal apps and credentials</p></figcaption></figure>

4. Log into your [PayPal developer portal](https://developer.paypal.com/home/) to visit your Developer account.
5. Click Apps & Credentials

<figure><img src="/files/j592rU1UJfcjgQDxuQsX" alt=""><figcaption><p>Create App Dialog Box</p></figcaption></figure>

6. Copy PayPal Client ID and Secret Key

<figure><img src="/files/oAFbRAWWbcoOEbzLUz4U" alt=""><figcaption><p>Copy Client ID and Secret Key</p></figcaption></figure>

7. Under the PayPal section, toggle the button near the PayPal tab to enable the same
8. Paste the client ID and client secret
9. Click Save

<figure><img src="/files/zwxBU7O4DX0PTXPPmAZU" alt=""><figcaption><p>Save PayPal key in WPRelay</p></figcaption></figure>

**Step 3: Payout with PayPal**

To payout rewards using PayPal:

1. Go to Dashboard -> Payouts
2. Click the Pay button beside the affiliate name

<figure><img src="/files/troWfgu6dabxU0EGNczi" alt=""><figcaption><p>Payout Tab</p></figcaption></figure>

3. In the Pay Affiliate dialog box, enter the amount to be redeemed as a gift card
4. Select PayPal&#x20;
5. Check the details and approve tick-box
6. Click Next

<figure><img src="/files/sJ0gjEtEkBtlIDZLFAWD" alt=""><figcaption></figcaption></figure>

Do more with PRO.[ Get WPRelay PRO](https://wprelay.com/pricing/).&#x20;

Still Unclear ?

If you need any assistance, please create a[ support request](https://wprelay.com/support/) at our ticket system. We are always happy to assist you :)

<br>


# Paypal Legacy

Learn how to enable and configure the PayPal Legacy payment method to pay your affiliates easily using the WP Relay plugin.

PayPal Legacy will help you easily payout directly using your PayPal credentials generated for WPRelay payout.

### To enable PayPal Legacy, <a href="#to-enable-paypal-classic" id="to-enable-paypal-classic"></a>

1. Navigate from the WPRelay dashboard -> Settings -> Payments
2. Under the PayPal Classic section, toggle the button near the PayPal Classic tab to enable the same

### Set Up PayPal Legacy, <a href="#set-up-paypal-classic" id="set-up-paypal-classic"></a>

1. Log in to your [PayPal account](https://www.paypal.com/bizsignup/#/checkAccount)
2. Go to Account Settings -> Account Access -> API Access (click Update)

<figure><img src="/files/GUUNs35inzC9ZaIi0z0M" alt=""><figcaption><p>API Access</p></figcaption></figure>

3. Select NVP/SOAP API Integration (Legacy)

<figure><img src="/files/9FFMveF0oxiPkGgCFELj" alt=""><figcaption><p>Select NVP/SOAP API Integration</p></figcaption></figure>

4. Copy the API Username, API Password, and Signature

![](https://docs.afflr.io/~gitbook/image?url=https%3A%2F%2Flh7-rt.googleusercontent.com%2Fdocsz%2FAD_4nXcUmir4w2F7SXFVvLpopBNrRl_TJVB0RGyCh_8V1yWjSlnW8b--aGs2FADlsJOO4JsbCKEh2Kwo40hqIVC8JZ7cCtu7U2WGZkMBbIs4gazl7kOjPTAcqclm7F29RqkN_zqqj-5_1ojKSKJZ3Gm52l5zyzKb%3Fkey%3D8ERvPPblwXUw5yORgCmLcg\&width=768\&dpr=4\&quality=100\&sign=af984a1f\&sv=2)API Username and Password

5. Paste the API Username, API Password, and Signature in WPRelay
6. Click Save
7. Copy the IPN webhook URL from WPRelay
8. In PayPal, go to Account Settings -> Notification
9. Click update near Instant payment notifications

<figure><img src="https://docs.afflr.io/~gitbook/image?url=https%3A%2F%2Flh7-rt.googleusercontent.com%2Fdocsz%2FAD_4nXetZLaO9twOI2BbyCxgBE1ZFxsWpb0cGCZBrsX2kqv9NBi9rPbsrbBbO-NtMRvqOf3F3ox3zs9G0RD-cjGFYFXRRHCXkc_l6Z8xak5ZlBh-whnrNuywl1n8liyYytHnidn3LM1GSSHbSLiwM66F_FrDXjY%3Fkey%3D8ERvPPblwXUw5yORgCmLcg&#x26;width=768&#x26;dpr=4&#x26;quality=100&#x26;sign=3d498e38&#x26;sv=2" alt=""><figcaption><p>Instant payment notifications</p></figcaption></figure>

10. Copy the Notification URL and Enable Recieve IPN messages
11. Click save

<figure><img src="https://docs.afflr.io/~gitbook/image?url=https%3A%2F%2Flh7-rt.googleusercontent.com%2Fdocsz%2FAD_4nXeRdryp4LRByIKWjTwd60Q2AvE2IPvxh5kATgA0WuWjiKUZ8ejbzLpUPUPK8KV0FRXvf-UVuy4kbiilm6aSwWHX0PLsyTkUJz4alojBgxebUnMv5r-NLBS5Qzra6C_1he4PXAT4bneJEBkpEnuHt6nhwo0%3Fkey%3D8ERvPPblwXUw5yORgCmLcg&#x26;width=768&#x26;dpr=4&#x26;quality=100&#x26;sign=27610beb&#x26;sv=2" alt=""><figcaption><p>IPN Settings</p></figcaption></figure>

Now, you are ready to use PayPal classic

**Step 3: Payout with PayPal**

To payout rewards using PayPal:

1. Go to Dashboard -> Payouts
2. Click the Pay button beside the affiliate name

<figure><img src="/files/troWfgu6dabxU0EGNczi" alt=""><figcaption><p>Payout Tab</p></figcaption></figure>

3. In the Pay Affiliate dialog box, enter the amount to be redeemed as a gift card
4. Select PayPal&#x20;
5. Check the details and approve tick-box
6. Click Next

<figure><img src="/files/sJ0gjEtEkBtlIDZLFAWD" alt=""><figcaption><p>Choose PayPal</p></figcaption></figure>

7. Click Pay to complete the process

<figure><img src="/files/oRx7xVFyaNSHUtJeh7OL" alt=""><figcaption><p>Pay</p></figcaption></figure>

Do more with PRO.[ Get WPRelay PRO](https://wprelay.com/pricing/).&#x20;

Still Unclear ?

If you need any assistance, please create a[ support request](https://wprelay.com/support/) at our ticket system. We are always happy to assist you :)


# Tremendous

This guide explains how to integrate Tremendous with the WPRelay plugin.

Confirm [Tremendous](https://www.tremendous.com/) allows you to send digital rewards, like gift cards, to your affiliates all over the globe using their mail ID. This type of reward will keep the affiliates motivated to perform better.

#### Step 1: Sign up with Tremendous <a href="#step-1-sign-up-with-tremendous" id="step-1-sign-up-with-tremendous"></a>

<figure><img src="https://docs.afflr.io/~gitbook/image?url=https%3A%2F%2Flh7-us.googleusercontent.com%2Fg34j1wTdcOfnIbMJI_H3tkk0WuqP4R7CJS6e3BAzMcBwB-PkaIZv1gVwg2jZkIIanRp2sQrHlIvhMU6YjY_3dMlljHeR9sDrCP3VW1zY2alVSt8Q3mDih6nMVPR37cI2SRYFCuMdlDMlmXyoSDkqDPM&#x26;width=768&#x26;dpr=4&#x26;quality=100&#x26;sign=5e60cbc&#x26;sv=2" alt=""><figcaption><p>Sign up to Tremendous</p></figcaption></figure>

#### Step 2: Add Money to your account <a href="#step-2-add-money-to-your-account" id="step-2-add-money-to-your-account"></a>

Add money to your tremendous account in order to allow the gift cards requested by your affiliates.

1. Select the billing option from the menu
2. Click on Add Funds

You can add money to the account via credit card or using a bank account.

<figure><img src="https://docs.afflr.io/~gitbook/image?url=https%3A%2F%2Flh7-us.googleusercontent.com%2Fn6yzVXlzy8ACOY6RkVqyagZp--3CITIMGI_TMcoPrjiKqOftPP1QLe4xLRxz7o2qzk9V87rnX0pX7Ob5fIP6bNFgQE1O8x98yrvrDk5FRdWRXoeEvAZwjTz2g4M0Hg1qFrrkUWMsoIM57HYSpsO3oao&#x26;width=768&#x26;dpr=4&#x26;quality=100&#x26;sign=8743d76&#x26;sv=2" alt=""><figcaption><p>Add Fund to Tremendous Account</p></figcaption></figure>

#### Step 3: Create a campaign <a href="#step-3-create-a-campaign" id="step-3-create-a-campaign"></a>

It is imperative to create a campaign that aligns with your affiliate program so you can send digital rewards to all your affiliates. Follow the steps to create a campaign.

1. Select Campaign templates
2. Click on the Create button

<figure><img src="https://docs.afflr.io/~gitbook/image?url=https%3A%2F%2Flh7-us.googleusercontent.com%2FFNqR-r6WV_dWFPHXeXXMPExRgQzdo8TKpV1ZpS0ix1xte5q1dMoWtSpUK1w7jMqXU4PUKbPZf6fXxh1EWaZALcLtHsbT70Rh26kH-DW9PdlLHQqkpHhESihOwx6HIxWOwrimVEDtI7XQZCcyMtAAzEI&#x26;width=768&#x26;dpr=4&#x26;quality=100&#x26;sign=a6940e9b&#x26;sv=2" alt=""><figcaption><p>Create Campaign</p></figcaption></figure>

3\. You can choose all rewards that affiliates can redeem as payouts. You can choose gift cards from various stores, charity donation cards, virtual visa cards, etc. Select the options you prefer.

4\. Click Continue

<figure><img src="https://docs.afflr.io/~gitbook/image?url=https%3A%2F%2Flh7-us.googleusercontent.com%2FZGXP5f5xk9XTGrXRv6_StAR2msTGqY97rocueDeTJY2XtB_5i9G6mWrP0h-c0kUjYDur_azG6t4WweyaubHyze74IV_bT9mTzsihTx7OxXRjwbS3UwTLXLoXsfskN4LK7hb5ZL6N9YU_KS9rJOCDn54&#x26;width=768&#x26;dpr=4&#x26;quality=100&#x26;sign=ee0cebc&#x26;sv=2" alt=""><figcaption><p>Select all rewards</p></figcaption></figure>

5\. Customize the mail content sent to the affiliates when they receive the reward. You can add a business logo, change the background color, subject, and email content, and even add a video.

6\. Click Save once the customization is complete

<figure><img src="https://docs.afflr.io/~gitbook/image?url=https%3A%2F%2Flh7-us.googleusercontent.com%2FChKDH6zSnzE6aOysCvDbzI1jMkOCnzfYasqiN9TRiInN-iGGwxU4VISjxFAZENWB9RgL8U70DZLMjkaUaD8hp-n1y8FN7nuaBBc3Iz3snJOq-Gnl2A5uDyE4yc7NtA4ofBBbJhbNtsfSuOhKVm5Vhpo&#x26;width=768&#x26;dpr=4&#x26;quality=100&#x26;sign=883eb049&#x26;sv=2" alt=""><figcaption><p>Customize Email Template</p></figcaption></figure>

7\. Check the preview of your template and then click Done

<figure><img src="https://docs.afflr.io/~gitbook/image?url=https%3A%2F%2Flh7-us.googleusercontent.com%2F87OGvD9EpibhzZKzWkbcO1oRLQGvw3_h_93Okx79YbZ1nfkeJujCao6J0jgkqJxcpFBVIFjIZjM15gt3Lnm46SUS6ItpwemWbH3RPWTDxaoJi0ogOTif3dZLBcUevYVwv9xulEcaW4JQcLbyBjZJYAY&#x26;width=768&#x26;dpr=4&#x26;quality=100&#x26;sign=c5952593&#x26;sv=2" alt=""><figcaption><p>Save Email Template</p></figcaption></figure>

8\. Enter the name of the campaign and choose if you would like to share it with the team or use it only personally.

9\. Click Save Campaign

You will find the campaign saved in Tremendous.

<figure><img src="https://docs.afflr.io/~gitbook/image?url=https%3A%2F%2Flh7-us.googleusercontent.com%2FwPnG1bTwlLbhQra-nkV-6Houhbqh-yMOWp6s7ZXSWPd0XbMQ8DatVZoMOJQEBJE9eW5cnnfyLW3QCcifOv-KRxoZYtm2sI2M0fB8ftWszCbypTIsBuJJlOfOAf2gsM2DqPSMjR-Q4Bpt4bam_6kf97k&#x26;width=768&#x26;dpr=4&#x26;quality=100&#x26;sign=e26db1ff&#x26;sv=2" alt=""><figcaption><p>Campaign Created</p></figcaption></figure>

#### Step 4: Integrate Tremendous with WPRelay <a href="#step-4-integrate-tremendous-with-afflr" id="step-4-integrate-tremendous-with-afflr"></a>

For you to be able to pay your affiliates using Tremendous in WPRelay, it is mandatory to integrate Tremendous with the WPRelay app. Here are the steps to do the same.

1. Expand the Team settings
2. Select Developers
3. Click Request production API Access

<figure><img src="/files/AtrH5G34Mxg5kcgtt921" alt=""><figcaption><p>Register API Key</p></figcaption></figure>

4. Provide the details needed in the API Access Form and keep clicking to continue

<figure><img src="/files/x1j0YT8fzEcPmpZEMTIU" alt=""><figcaption><p>Enter API Access Form</p></figcaption></figure>

5. Click Generate an API key

<figure><img src="/files/s9S8oZJgAsin5NynncAX" alt=""><figcaption><p>Generate API Key</p></figcaption></figure>

6. Enter the API Key name

<figure><img src="/files/sZlGLY2bkrIO53v1Bg5R" alt=""><figcaption><p>Enter API Key Name</p></figcaption></figure>

7. Copy API Key

<figure><img src="/files/w5HaFd0RAuBcPQq2xoo1" alt=""><figcaption><p>Copy API key</p></figcaption></figure>

8\. Navigate from the Afflr dashboard -> Settings -> Payments

9\. Under the Tremendous section, toggle the button near the Tremendous tab to enable the same

10\. Paste the API Key

11\. Click Save

<figure><img src="https://docs.afflr.io/~gitbook/image?url=https%3A%2F%2Flh7-rt.googleusercontent.com%2Fdocsz%2FAD_4nXc0UZoQ7DRWcqwLSXPvvoT42N6UDe4fKk_QtriEvnLBGhWgZ8cIi0uCyKytsF_UBh1sCKQFhRRhQ22EQ6VxIJ4rVIxH3IshK3rjGAk2hywqQRY1Y15fGTau5_3s46zYBRO15p01M0u34lVu0zzv-a_3u8U%3Fkey%3D8ERvPPblwXUw5yORgCmLcg&#x26;width=768&#x26;dpr=4&#x26;quality=100&#x26;sign=9d51a900&#x26;sv=2" alt=""><figcaption><p>Save API Key</p></figcaption></figure>

### To make payment using Tremendous, <a href="#to-make-payment-using-tremendous" id="to-make-payment-using-tremendous"></a>

1. Navigate from Dashboard -> Payout, select Balance Tab
2. Click Pay beside the affiliate name

<figure><img src="/files/ZaNVERyTYSh9Qxvb1JFx" alt=""><figcaption><p>Pay Affiliates</p></figcaption></figure>

3. Enter the amount to be paid
4. Select Tremendous
5. Confirm payment and click pay
6. Click Next

<figure><img src="/files/8DVpcYxdFmpDgsmtD4em" alt=""><figcaption></figcaption></figure>

6. Confirm payment

<figure><img src="/files/rtQYkeXtckMOqo6vGIkP" alt=""><figcaption></figcaption></figure>

#### Additional Settings in Tremendous <a href="#additional-settings-in-tremendous" id="additional-settings-in-tremendous"></a>

**Enable Low Balance Alerts**

This feature will notify you when your Tremendous account balance gets lower than a certain point pre-set by you. The notification will be received as an email.

To enable this feature,

1. In the Tremendous dashboard, navigate to Billing -> Balance
2. Click the Enable button under 'Low balance alerts'

<figure><img src="https://docs.afflr.io/~gitbook/image?url=https%3A%2F%2Flh7-us.googleusercontent.com%2FKxfjJlCklgzyjQu_mkH7j4VTEu-GmpZ48UMkIE7koOvKE2y7FLLLAJR5aZlO4vc7Iutz_aszHv5tmHCi5i2AaaCbR7UOTM4gCydYyUtE2nO5g5kdlGDh0LPAKmU0XSDOmJVuJR9bvzvOUg9y3rJgKYA&#x26;width=768&#x26;dpr=4&#x26;quality=100&#x26;sign=d0b33443&#x26;sv=2" alt=""><figcaption><p>Enable low balance alert</p></figcaption></figure>

3. Set up a low balance alerts dialog box where you can enter the limit for low balance and tick the checkbox where notification mail can be sent.
4. Click Turn on to set the alert

<figure><img src="https://docs.afflr.io/~gitbook/image?url=https%3A%2F%2Flh7-us.googleusercontent.com%2FDh2CVKjNLfjCjHJaP_lx0Lj5Rj5xcI94hbFfdSyqj24EDhdC82zzWp5tf_UtsehBZEYH98hbQ-k2nsr_tmtnziB6QOageW3of4FsI4B_tx5B0HGY5xkDchr04UechT-uN5dkWmw6oOgsc00MNqqAZ-M&#x26;width=768&#x26;dpr=4&#x26;quality=100&#x26;sign=32517b6e&#x26;sv=2" alt=""><figcaption><p>Set low balance alert</p></figcaption></figure>

**W-9 Collection**

In order to ease the tax burden, Tremendous urges recipients to fill W-9 form before redeeming the card.

You can access this feature in Team Settings -> W-9 Collection

<figure><img src="https://docs.afflr.io/~gitbook/image?url=https%3A%2F%2Flh7-us.googleusercontent.com%2FxyGJCqbdxJFnhf-bChuBQ9Za3CvALz4l5fm2eeh2RZwaGl4QL5Idm16rH024ogebpnffPl2nr_tJDVRU38ts2KHaxtFHBHZeqRhoUGczo5FCejDRthhtSpoNsfqf8DtxVS4_dQoiss3BNAyaRQejnhs&#x26;width=768&#x26;dpr=4&#x26;quality=100&#x26;sign=8ef0df9f&#x26;sv=2" alt=""><figcaption></figcaption></figure>

\
Do more with PRO.[ Get WPRelay PRO](https://wprelay.com/pricing/).&#x20;

Still Unclear ?

If you need any assistance, please create a[ support request](https://wprelay.com/support/) at our ticket system. We are always happy to assist you :)


# Coupon Payout

Learn how to configure the coupon payout method for the affiliates in the Settings page of the WP Relay plugin.

The **coupon payment setting** allows you to pay the affiliate commission using a coupon instead of a direct payment.

**To enable coupon payout**

* Navigate from the WPRelay dashboard -> Settings -> Payments
* Under the payment section, toggle the button near the coupon tab to enable the same.

<figure><img src="/files/aIRVPC5wdFsk6S1fhash" alt=""><figcaption></figcaption></figure>

&#x20; **Additional coupon payout configuration**

* Next to 'enable' button you have 'manage' option.

<figure><img src="/files/vRZ20LDtknSXbv2NpPK8" alt=""><figcaption></figcaption></figure>

* Click on it and you will forwarded to coupon payouts configuration page.

<figure><img src="/files/xTeN8IzPnl4gCg3fImN9" alt=""><figcaption></figcaption></figure>

* There you have additional options to set the minimum payout value.

**Example** **Scenario**&#x20;

If the person sets the minimum payout threshold value as $10, then the minimum payout through the coupon is $10.

<figure><img src="/files/6ca6i3iPV1yUaA9fiHdm" alt=""><figcaption></figcaption></figure>

* Also, you have an additional option to set coupon expiry time in days.

<figure><img src="/files/9gs75Wmbh3ckEpEIM0wr" alt=""><figcaption></figcaption></figure>

* To access your affiliate commission, simply navigate to the 'payouts' section and click on 'affiliate payouts.
* As you navigate to the new payout page, you'll notice a convenient 'payment method' option available for you to choose from.
* Choose 'coupon' option.
* Then, add admin and affiliate notes and proceed with payout.

<figure><img src="/files/dkFChIbrlI6P1YYicf0d" alt=""><figcaption></figcaption></figure>

* Once the admin has processed payment to the affiliate, you'll be able to access the coupons in the payment history section on the payouts page.

<figure><img src="/files/5mLdjfq5N98XfSTfcFwV" alt=""><figcaption></figcaption></figure>

* Similarly, once the admin has successfully processed the payment to the affiliate, the affiliate can see the coupon in their 'my account' page under the payouts section.

<figure><img src="/files/JeUUARuREixsbBZkj90L" alt=""><figcaption></figcaption></figure>

Do more with PRO.[ Get WPRelay PRO](https://wprelay.com/pricing/).&#x20;

Still Unclear ?

If you need any assistance, please create a[ support request](https://wprelay.com/support/) at our ticket system. We are always happy to assist you :)


# Email Notification

Discover the email notification options offered by WPRelay and explore methods for customizing them to fit your needs from this guide.

The WP Relay plugin has inbuilt email templates which can be configured and categorized by the store owner.&#x20;

{% embed url="<https://youtu.be/G3rJ42HH7mI>" %}

There are 7 email templates available in WPRelay. Out of 7, 2 emails will be sent only to administrators and the remaining 5 will be sent only to Affiliates. The emails are:&#x20;

**For administrators:**&#x20;

* **New Affiliate Registration Email:** This email alert is sent directly to the store owner when a new affiliate registers on the platform.
* **New Affiliate Sale Email:** This email is sent to the store owner when an affiliate generates a sale for you.

{% hint style="info" %}
Haven't yet purchased the WPRelay PRO?

[Buy WPRelay PRO](https://wprelay.com/pricing/)
{% endhint %}

**For affiliates:**&#x20;

* **Affiliate Approved Email:** This Email is sent to the affiliate upon approval of their account in the program.
* **Affiliate Rejected Email:** This Email is sent to the affiliate upon the rejection of their account in the program.
* **Commission Approved Email:** This Email is sent to the affiliate upon approval of their commission.
* **Commission Rejected Email:** This Email is sent to the affiliate upon rejection of their commission.
* **Payment Processed Email:** This Email is sent to the affiliate when their payments are completed.

**For example, here is a screenshot of an email when an affiliate account is approved:**

<figure><img src="/files/viokVsJPfLzT8sRQLdKj" alt=""><figcaption></figcaption></figure>

**How to enable/disable the emails?**

**Step 1:** Go to the WPRelay -> Settings -> Email Settings

Using this toggle, we can enable/ disable each Email and save the changes.&#x20;

**Affiliate Emails**&#x20;

<figure><img src="/files/19XydVwJDkiXE4rYQEzK" alt=""><figcaption></figcaption></figure>

**Admin Emails**

<figure><img src="/files/BwpwgX6p7pSwS4SI27oU" alt=""><figcaption></figcaption></figure>

**Customizing the Email template**

It is possible to modify the Email template using the default WooCommerce Email editor. However, if you wish to alter the email template design, you'll need to create an override for the email template in your theme. Here are the paths for each template to create an override:

There is a simple method to override the file in just a single click.

Here are a few steps to customize the mail:

**STEP 1:** Navigate to WooCommerce -> Settings -> Emails -> click on the Manage button

<figure><img src="/files/NxionOZXaw4u30PTQZLk" alt=""><figcaption></figcaption></figure>

**STEP 2:** Click on the copy file to the theme, which will automatically create an override on your template folder

<figure><img src="/files/ba1JO7ngEL8cfS1cweaN" alt=""><figcaption></figcaption></figure>

**STEP 3**: Click on "**View Template**"

<figure><img src="/files/y9owIj1YabPzaWdO1N2Z" alt=""><figcaption></figcaption></figure>

**STEP 4**: By clicking "view template", you can customize your email templates.

<figure><img src="/files/VUx0oNkMMK4NGsazONcy" alt=""><figcaption></figcaption></figure>

Once the files are overridden in your theme folder, you can then edit the overridden file and make your changes.&#x20;

After making changes, By clicking "save changes" you can save the file.

{% hint style="info" %}
Haven't yet purchased the WPRelay PRO?

[Buy WPRelay PRO](https://wprelay.com/pricing/)
{% endhint %}

**Next Steps:**

**You may also want to check out these helpful guides:**

* [For more information about the Affiliate Registration Page, please refer to this document.](https://docs.wprelay.com/manage-affiliates/creating-an-affiliate-registration-form)
* [Explore this guide to learn about various methods to become an affiliate.](https://docs.wprelay.com/manage-affiliates/becoming-an-affiliate)
* [Learning how to configure the General Settings page.](https://docs.wprelay.com/settings/general-settings)

**Still Unclear?**

If you need any assistance, please create a [support request](https://wprelay.com/support/) in our ticket system. We are always happy to assist you :)


